


Visualization#
Isaac Lab offers several lightweight visualizers for real-time simulation inspection and debugging. Unlike renderers that process sensor data, visualizers are meant for fast, interactive feedback.
Most visualizers can be combined with any physics engine or rendering backend.
The exception is the Kit visualizer with kit-less OV backends:
--visualizer kit cannot be used with presets=ovphysx or
ovrtx in the same process. Use --visualizer newton_gl,
--visualizer rerun, --visualizer viser, or omit --visualizer
for headless execution.
Overview#
Isaac Lab supports four visualizer backends, each optimized for different use cases:
Visualizer |
Best For |
Key Features |
|---|---|---|
Omniverse |
High-fidelity, Isaac Sim integration |
USD, visualization markers, live plots, tiled camera panel |
Newton GL |
Fast iteration |
Low overhead, visualization markers, streaming camera panel |
Newton RTX (experimental) |
OVRTX path-tracing |
Photorealistic rendering, studio lighting (visualization markers, live plots, and streaming camera panel not yet supported) |
Rerun |
Remote viewing, replay |
Webviewer, time scrubbing, recording export, visualization markers, live plots |
Viser |
Web-based remote visualization, sharing, recording |
Warp-based rendering, browser-based, share URL, visualization markers, live plots |
The following visualizers are shown training the Isaac-Velocity-Flat-AnymalD environment.
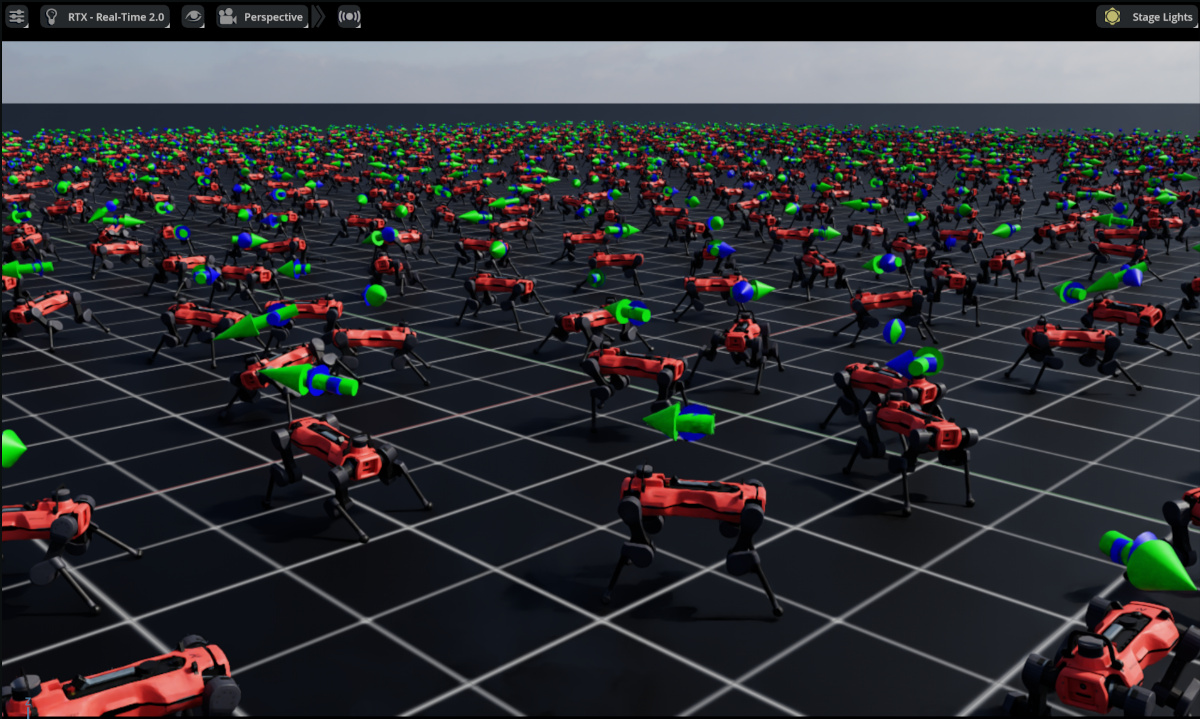
Omniverse Visualizer#
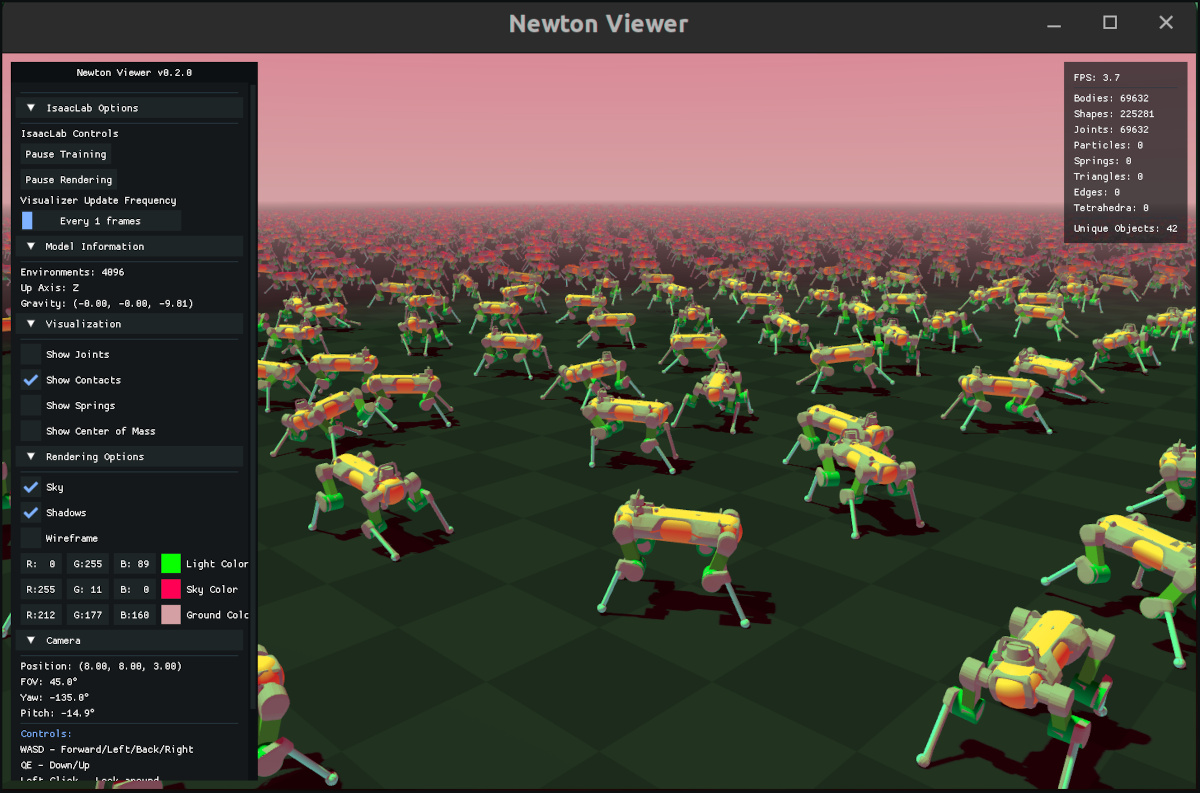
Newton Visualizer#
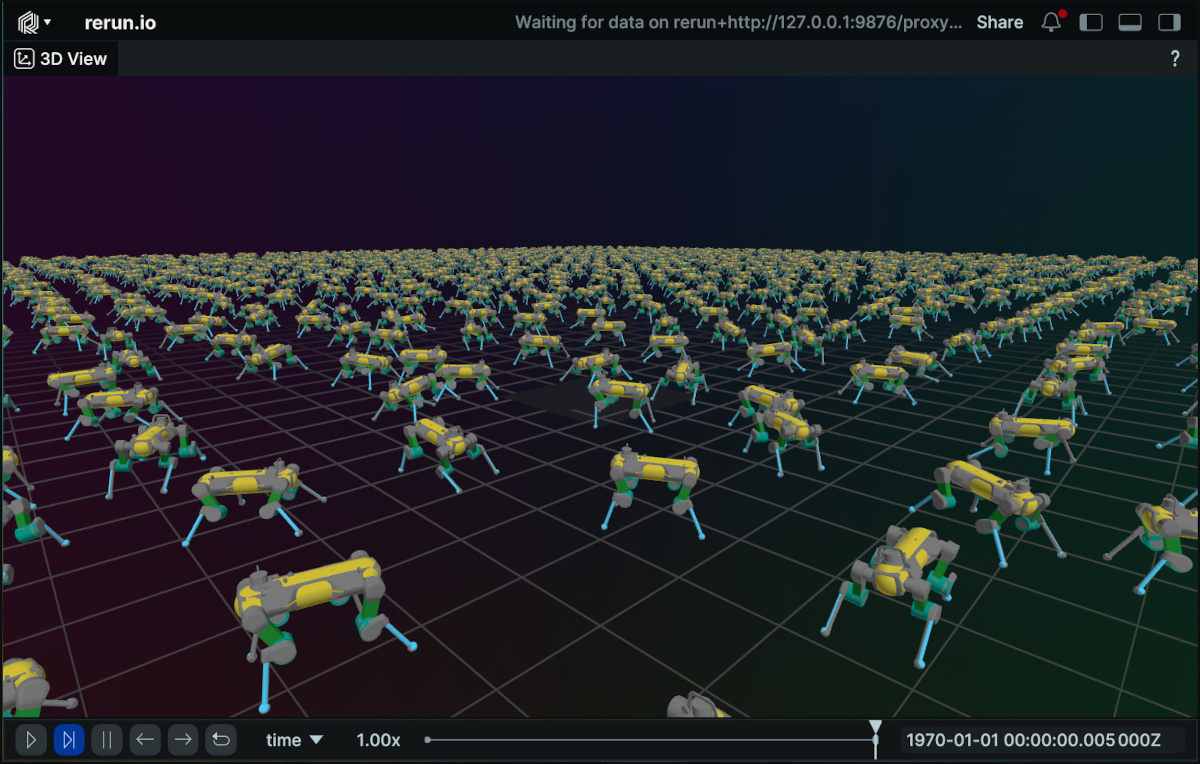
Rerun Visualizer#
Quick Start#
Launch visualizers from the command line with --visualizer (or --viz alias):
# Launch all visualizers (comma-delimited list, no spaces)
uv run isaaclab train --rl_library rsl_rl --task Isaac-Cartpole --viz kit,newton_gl,rerun

# Launch only the Newton GL visualizer
uv run isaaclab train --rl_library rsl_rl --task Isaac-Cartpole --viz newton_gl

# Launch the Newton RTX path-tracer visualizer (requires OVRTX)
uv run isaaclab train --rl_library rsl_rl --task Isaac-Cartpole presets=newton_mjwarp --viz newton_rtx

# Launch the Viser web-based visualizer
uv run isaaclab train --rl_library rsl_rl --task Isaac-Cartpole --viz viser
# Launch all visualizers (comma-delimited list, no spaces)
./isaaclab.sh train --rl_library rsl_rl --task Isaac-Cartpole --viz kit,newton_gl,rerun

# Launch only the Newton GL visualizer
./isaaclab.sh train --rl_library rsl_rl --task Isaac-Cartpole --viz newton_gl

# Launch the Newton RTX path-tracer visualizer (requires OVRTX)
./isaaclab.sh train --rl_library rsl_rl --task Isaac-Cartpole presets=newton_mjwarp --viz newton_rtx

# Launch the Viser web-based visualizer
./isaaclab.sh train --rl_library rsl_rl --task Isaac-Cartpole --viz viser
To run in headless mode, omit the --viz argument:
uv run isaaclab train --rl_library rsl_rl --task Isaac-Cartpole
./isaaclab.sh train --rl_library rsl_rl --task Isaac-Cartpole
Configuration#
Launching visualizers with the command line will use default visualizer configurations. Visualizer backends live in the isaaclab_visualizers package (e.g. source/isaaclab_visualizers/isaaclab_visualizers/kit, newton, rerun, viser).
You can also configure custom visualizers in the code by defining VisualizerCfg instances for the SimulationCfg, for example:
from isaaclab.sim import SimulationCfg
from isaaclab_visualizers.kit import KitVisualizerCfg
from isaaclab_visualizers.newton import NewtonGLVisualizerCfg
from isaaclab_visualizers.rerun import RerunVisualizerCfg
from isaaclab_visualizers.viser import ViserVisualizerCfg

sim_cfg = SimulationCfg(
    visualizer_cfgs=[
        KitVisualizerCfg(
            # Omit create_viewport (default False) to use the active viewport; set
            # create_viewport=True and optionally viewport_name to add a dedicated window.
            eye=(0.0, 0.0, 20.0), # high top down view
            lookat=(0.0, 0.0, 0.0),
        ),
        NewtonGLVisualizerCfg(
            eye=(5.0, 5.0, 5.0), # closer quarter view
            lookat=(0.0, 0.0, 0.0),
            show_joints=True,
        ),
        RerunVisualizerCfg(
            keep_historical_data=True,
            keep_scalar_history=True,
            record_to_rrd="my_training.rrd",
        ),
        ViserVisualizerCfg(
            port=8080,
            bind_address="0.0.0.0",
            display_address="localhost",
            share=False,
        ),
    ]
)
Resolution Rules (CLI + Config)#
The effective visualizer mode is resolved from both CLI and SimulationCfg.visualizer_cfgs:
--viz(alias:--visualizer) uses comma-separated values (for example--viz kit,newton_gl).If
--vizis omitted, Isaac Lab falls back toSimulationCfg.visualizer_cfgs(see Configuration).--viz noneexplicitly disables all visualizers.
For the migration-focused summary and deprecation context, see Migrating to Isaac Lab 3.0.
Partial Visualization#
Visualizers can be configured to visualize just a subset of environments. This is called partial visualization.
There are 3 fields exposed in the VisualizerCfg for selecting environments for partial visualization:
max_visible_envscaps how many envs are shown.visible_env_indicesexplicitly selects the envs to visualize.randomly_sample_visible_envs(defaultTrue): whenvisible_env_indicesis unset andmax_visible_envsis set, enables randomly sampling the selected envs. If disabled, the firstmax_visible_envsenvs are selected.
Also, there is a CLI arg --max_visible_envs that overrides VisualizerCfg.max_visible_envs for the run.
Newton environments can share simulated coordinates, for example when scene.env_spacing=0.
Use world_spacing to arrange selected
worlds visually without changing their simulated poses:
from isaaclab_visualizers.newton import NewtonGLVisualizerCfg
NewtonGLVisualizerCfg(
    visible_env_indices=[0, 1, 2, 3],
    world_spacing=(2.0, 2.0, 0.0),
)
Dense environment-major VisualizationMarkers batches follow the same
selection and visual offsets. This includes point-cloud and task-geometry markers.
For RTX tiled cameras, pass one environment_ids entry per marker instance to
visualize() so global point-instancer
markers are isolated with their environments.
CLI args |
visualizer configs |
Effective behavior |
|---|---|---|
no |
|
Run headless. |
|
|
Launch default Kit and default Newton visualizers. |
|
|
Launch default Kit and custom Newton; Rerun is not launched. |
no |
|
Launch custom Newton and custom Rerun visualizers from config. |
|
|
Run headless with all visualizers disabled. |
Camera Modes#
The default visualizer camera mode is interactive, with eye and lookat specifying the initial pose.
All visualizer backends also support a streaming camera view that composites per-environment
ground-truth frames into a single image panel updated every step.
Note
The legacy tiled_cam_* fields (tiled_cam_view, tiled_cam_prim_path, etc.) have been
replaced by the streaming_* fields described in the Streaming Camera View section below.
Streaming Camera View#
The streaming view replaces the legacy tiled_cam_* fields with a unified API that works across
all four visualizer backends. When streaming_view=True, the visualizer captures pixels from a
camera sensor each step, composites them into a single image tiled by environment and GT type, and
displays or streams the result.
Configuration fields (all defined on VisualizerCfg):
Field |
Description |
|---|---|
|
Enable the streaming camera panel (default |
|
List of ground-truth types shown left-to-right per env row.
Valid values: |
|
|
|
Near/far clip [m] for the turbo depth colormap. |
|
Prim path of an existing |
|
Settings for the auto-created camera (ignored when |
Example — stream RGB and depth from an existing sensor for two specific envs:
from isaaclab_visualizers.newton import NewtonGLVisualizerCfg

visualizer_cfg = NewtonGLVisualizerCfg(
    streaming_view=True,
    streaming_sensor_prim_path="/World/envs/*/Camera",
    streaming_envs=[0, 1],
    streaming_gt_types=["rgb", "depth"],
    streaming_depth_max=5.0,
)
Colorization is handled by CameraFrameColorizer
in isaaclab.envs.utils.camera_colorizer. Depth uses the turbo colormap; segmentation uses a
golden-ratio hue palette to assign each class ID a distinct color.
Per-backend behavior:
Newton GL — shows an image panel in the HUD sidebar (“Streaming Camera View” dropdown).
Kit (Omniverse) — shows an image panel in the Isaac Lab omni.ui window.
Rerun — pushes the composited frame to a 2D image view as the primary camera display each step.
Viser — streams the frame as a background image updated each step.
Note
The Newton RTX visualizer is experimental. Visualization markers, live plots, and the
HUD streaming camera panel are not supported in this release. However, TiledCamera-based
frame capture for streaming is supported independently of the ViewerRTX display path.
When using the OVRTX renderer for the streaming camera (streaming_cam_renderer="ovrtx"),
the patchelf SONAME fix must be applied first — see the installation notes for
presets=ovrtx.
Note
OVRTX streaming camera — per-backend support:
Kit, Rerun, Viser (
streaming_cam_renderer="ovrtx"): Supported. Theovstagenative library (libosdCPU.so.3.6.0) is pre-loaded automatically soovrtx.Renderercan initialize without a manualLD_LIBRARY_PATHchange.Newton GL (
streaming_cam_renderer="ovrtx"): Supported whenstreaming_sensor_prim_pathpoints at an existing scene camera (see note below on auto-create mode). Usestreaming_cam_renderer="newton_warp"(the default) for the auto-create camera path.Newton RTX: The viewer itself renders via OVRTX. The streaming camera panel is not available on the RTX backend in this release.
Note
Auto-create streaming camera and Newton MJWarp (``replicate_physics=True``)
When streaming_sensor_prim_path is None (auto-create mode), the visualizer
spawns a new camera prim after scene construction has already finalised Newton’s clone plan. With replicate_physics=True — which Newton MJWarp requires for
its high-performance sparse world replication — only env_0 exists as a USD prim after
physics init; env_1..N are handled internally by Newton without USD prims. The
spawned cameras at env_1..N are silently dropped, FrameView resolves only one
prim, and initialisation raises:
RuntimeError: Number of camera prims in the view (1) does not match
the number of environments (N).
Workaround: set streaming_sensor_prim_path to an existing scene camera that was
declared in the scene config and therefore included in Newton’s clone plan before physics
init. For tasks that already have a TiledCamera (e.g. vision-based manipulation
tasks), point the streaming view at it directly:
NewtonGLVisualizerCfg(
    streaming_view=True,
    streaming_sensor_prim_path="/World/envs/env_.*/Camera",
    streaming_envs=12,
)
Planned fix: add a pre_physics_init hook to NewtonVisualizer that
registers the streaming camera prim at env_0 before Newton finalises its clone plan.
Newton then replicates the camera to all worlds automatically, restoring the full
auto-create experience (eye, lookat, follow target) on newton_mjwarp tasks.
Live Plots#
Live plots stream per-step scalar data into the visualizer each step. All four backends
support live plots. Live plots are enabled by default (enable_live_plots=True)
but plot windows and panels start hidden or collapsed, so there is no overhead unless
you open them.
What is plotted:
Manager-based environments (
ManagerBasedRLEnv): all active manager terms (actions, observations, rewards, commands, terminations, curriculum) grouped per manager, plusepisode/total_rewardandepisode/episode_lengthas top-level training metrics.Direct environments (
DirectRLEnv):episode/total_rewardandepisode/episode_length.
Each multi-dimensional term (e.g. joint_pos with 8 joints) is displayed as a single
chart with one line per component, matching the Kit visualizer’s per-term grouping.
Disabling live plots:
Live plots are on by default but are automatically skipped when running truly headless (no Kit GUI and no standalone visualizer such as Newton, Rerun, or Viser). To disable them explicitly (e.g. to reduce overhead during profiling):
from isaaclab_visualizers.newton import NewtonGLVisualizerCfg

visualizer_cfg = NewtonGLVisualizerCfg(
    enable_live_plots=False,
)
Per-backend behavior:
Kit (Omniverse): Plots appear as collapsible panels in the IsaacLab omni.ui window, collapsed by default. Toggle individual panels to show them.
Newton: A floating “Live Plots” ImGui window appears at the bottom-right of the viewport, collapsed to its title bar by default. Click the title bar to expand it. Individual term groups are shown as collapsing headers inside the window.
Rerun: One
TimeSeriesViewper manager/group is added to the blueprint, hidden by default. Toggle panels on via the Rerun blueprint panel on the left. Setkeep_scalar_history=TrueinRerunVisualizerCfgso that scalars accumulate as a time series in the Rerun timeline.Viser: One collapsible folder per term is added to the Viser sidebar, collapsed by default. Expand individual folders to show their charts.
Video Recording#
Video recording is configured on env_cfg.video_recorders and driven internally by
env.step() — no gym wrapper required. The source string selects whether to capture from
a visualizer viewport ("visualizer:kit", "visualizer:newton_gl") or a named scene sensor
("sensor:tiled_camera"), and each entry produces an independent mp4 clip stream.
See Recording Video for a full guide with examples.
Visualizer Backends#
Omniverse Visualizer#
Main Features:
Native USD stage integration
Live plots for monitoring training metrics
Full Isaac Sim rendering capabilities and tooling
Visualization markers for debugging (arrows, frames, object targets, etc.)
Tiled camera views which can track multiple robots
Core Configuration:
from isaaclab_visualizers.kit import KitVisualizerCfg

visualizer_cfg = KitVisualizerCfg(
    # Viewport: default is create_viewport=False (use active viewport).
    # Set create_viewport=True to create a docked window; viewport_name=None uses the default name.
    create_viewport=False,
    dock_position="SAME",
    window_width=1280,
    window_height=720,

    eye=(8.0, 8.0, 3.0),
    lookat=(0.0, 0.0, 0.0),

    enable_markers=True,
    enable_live_plots=True,  # set to False to disable live plots
)
When Isaac RTX scene partitioning is enabled, AppLauncher
turns on the all-environment spectator view when the Kit viewport is enabled or
Kit visualization, recording, livestreaming, or XR is requested. Regular headless
camera-sensor runs retain partition isolation. See Renderers for
configuration and content constraints.
Newton Visualizer#
Main Features:
Lightweight OpenGL rendering with low overhead
Simulation and rendering pause controls
Right-click rigid-body dragging with Newton rigid-body solvers
Adjustable update frequency for performance tuning
Some customizable rendering options (shadows, sky, wireframe)
Visualization markers (joints, contacts, springs, COM, debug markers)
Tiled camera views which can track multiple robots
Interactive Controls:
Key/Input |
Action |
|---|---|
W, A, S, D or Arrow Keys |
Forward / Left / Back / Right |
Q, E |
Down / Up |
Left Click + Drag |
Look around |
Right Click + Drag |
Apply an interactive force to a dynamic Newton rigid body |
Mouse Scroll |
Zoom in/out |
H |
Toggle UI sidebar |
ESC |
Exit viewer |
Core Configuration:
from isaaclab_visualizers.newton import NewtonGLVisualizerCfg

visualizer_cfg = NewtonGLVisualizerCfg(
    # Window settings
    window_width=1920,                        # Window width in pixels
    window_height=1080,                       # Window height in pixels

    # Camera settings
    eye=(8.0, 8.0, 3.0),                     # Initial camera position (x, y, z)
    lookat=(0.0, 0.0, 0.0),                  # Camera look-at target
    focal_length=12.0,                        # Camera focal length in millimeters

    # Streaming camera view settings
    streaming_view=True,                      # Enable non-interactive streaming camera image view
    streaming_envs=16,                        # Number of env tiles to show (or explicit list of env ids)
    streaming_sensor_prim_path=None,          # Existing Camera sensor prim path, e.g. "/World/envs/*/Camera"
    streaming_cam_eye=(4.0, -4.0, 3.0),       # Eye offset for generated streaming cameras
    streaming_cam_target_prim_path=None,      # None (default): adopt first scene camera found
                                              # at init. Set explicitly (e.g. "/World/envs/*/Robot")
                                              # only when a specific follow-prim is needed.

    # Performance tuning
    update_frequency=1,                       # Update every N frames (1=every frame)

    # Physics debug visualization
    show_joints=False,                        # Show joint visualizations
    show_contacts=False,                      # Show contact points and normals
    show_springs=False,                       # Show spring constraints
    show_com=False,                           # Show center of mass markers
    enable_picking=True,                      # Enable Newton rigid-body dragging

    # Rendering options
    enable_shadows=True,                      # Enable shadow rendering
    enable_sky=True,                          # Enable sky rendering
    enable_wireframe=False,                   # Enable wireframe mode

    # Color customization
    sky_upper_color=(0.53, 0.81, 0.92),       # Upper sky color (RGB [0,1])
    sky_lower_color=(0.18, 0.20, 0.25),      # Lower sky / ground color (RGB [0,1])
    light_color=(1.0, 1.0, 1.0),             # Directional light color (RGB [0,1])
)
Note
Object dragging requires an interactive Newton visualizer with a Newton rigid-body solver (MJWarp, XPBD, VBD, Featherstone, or Kamino), either standalone or in a supported coupled solver with a rigid-body entry. Static and kinematic bodies and MPM particles are not moved. Picking is disabled automatically for headless viewers, standalone MPM, and non-Newton physics.
Rerun Visualizer#
Main Features:
Web viewer interface accessible from local or remote browser
Metadata logging and filtering
Recording to .rrd files for offline replay (.rrd files can be opened with ctrl+O from the web viewer)
Timeline scrubbing and playback controls of recordings
Visualization debug markers
Pause Rendering / Reset Episode controls via the ImGui sidebar (under IsaacLab Controls)
Note
Rerun’s ImGui overlay is embedded in the Newton viewer process. Custom interactive controls are limited to what ImGui exposes within that context; simulation pause is not supported from Rerun. Use the Viser visualizer for full interactive controls.
Note
Video recording (--video) is not supported with the Rerun visualizer. Rerun is a
remote streaming tool and does not expose a local frame-capture API. To record video while
running Rerun, add a headless KitVisualizerCfg or
NewtonGLVisualizerCfg to sim.visualizer_cfgs
and use it as the recording source. Frames can also be captured directly from a scene
camera sensor using VideoRecorderCfg(source="sensor:<name>").
See Recording Video for details.
Important
A highlighted Rerun browser URL is printed in the logs before the main simulation or training loop begins.
Ctrl-click the printed URL in supported terminals/IDEs to open it. Set open_browser=True to automatically
open the browser tab instead.
Example:
╭─────────────────────────── rerun (listening *:9090) ───────────────────────────╮
│             ╷                                                                  │
│   URL       │ http://127.0.0.1:9090/?url=rerun%2Bhttp://127.0.0.1:9876/proxy   │
│             ╵                                                                  │
╰────────────────────────────────────────────────────────────────────────────────╯
Core Configuration:
from isaaclab_visualizers.rerun import RerunVisualizerCfg

visualizer_cfg = RerunVisualizerCfg(
    # Server settings
    app_id="isaaclab-simulation",             # Application identifier for viewer
    grpc_port=9876,                           # gRPC endpoint for logging SDK connection
    web_port=9090,                            # Port for local web viewer URL printed in logs
    bind_address="0.0.0.0",                  # Endpoint host formatting/reuse checks
    open_browser=False,                       # Set True to auto-launch the browser

    # Camera settings
    eye=(8.0, 8.0, 3.0),                     # Initial camera position (x, y, z)
    lookat=(0.0, 0.0, 0.0),                  # Camera look-at target

    # History settings
    keep_historical_data=False,               # Keep transforms for time scrubbing
    keep_scalar_history=False,                # Keep scalar/plot history

    # Recording
    record_to_rrd="recording.rrd",            # Path to save .rrd file (None = no recording)
)
Rerun startup uses the Python SDK through newton.viewer.ViewerRerun (no external rerun CLI process
management). If grpc_port is already active, Isaac Lab reuses that server. If web_port is occupied while
starting a new server, initialization fails with a clear port-conflict error.
To save a replay, set record_to_rrd to the output .rrd path. Enable
keep_historical_data and keep_scalar_history when you want transform and scalar history to be available
for timeline scrubbing. After the run, open the Rerun web viewer and press Ctrl+O to load the saved .rrd file.
Note, the timeline UI elements are for .rrd recording playback timeline scrubbing.
Viser Visualizer#
The Viser visualizer provides a web-based 3D viewer for Isaac Lab simulations powered by the Newton Warp renderer. It streams the simulation state to a local web server, allowing you to view and interact with the scene from any browser.
Main Features:
Browser-based visualization accessible at
http://localhost:8080by defaultOptional public share URL for remote viewing
Recording to
.viserformat for replayEnvironment filtering to control which environments are rendered
Visualization debug markers (joints, contacts, center of mass, particles, and more — toggled from the Isaac Lab → Visualization Markers sidebar panel)
Interactive sidebar controls: Pause Rendering (freezes the 3D view without stopping physics), Pause Simulation (pauses the training/rollout loop), and Reset Episode
Note
Video recording (--video) is not supported with the Viser visualizer. Viser is a
browser-streaming tool and does not expose a local frame-capture API. To record video while
running Viser, add a headless KitVisualizerCfg or
NewtonGLVisualizerCfg to sim.visualizer_cfgs
and use it as the recording source. Frames can also be captured directly from a scene
camera sensor using VideoRecorderCfg(source="sensor:<name>").
See Recording Video for details.
Important
A highlighted Viser browser URL is printed in the logs before the main simulation or training loop begins.
Ctrl-click the printed URL in supported terminals/IDEs to open it. Set open_browser=True to automatically
open the browser tab instead. For remote access, keep bind_address="0.0.0.0" and set
display_address to the hostname or IP address reachable from your browser.
Example:
╭────── viser (listening *:8080) ───────╮
│             ╷                         │
│   URL       │ http://localhost:8080   │
│             ╵                         │
╰───────────────────────────────────────╯
Core Configuration:
from isaaclab_visualizers.viser import ViserVisualizerCfg

visualizer_cfg = ViserVisualizerCfg(
    # Server settings
    port=8080,                                # Port for local Viser web server
    bind_address="0.0.0.0",                  # Interface to listen on; use 0.0.0.0 for remote access
    display_address="localhost",             # Host/IP shown in the printed browser URL
    open_browser=False,                       # Set True to auto-launch the browser
    label="Isaac Lab Simulation",             # Page title shown in the viewer
    share=False,                              # Request a public share URL for remote viewing
    verbose=True,                             # Print viewer server startup information

    # Camera settings
    eye=(8.0, 8.0, 3.0),                     # Initial camera position (x, y, z)
    lookat=(0.0, 0.0, 0.0),                  # Camera look-at target

    # Environment filtering
    max_visible_envs=16,                      # Maximum number of environments to visualize

    # Recording
    record_to_viser="recording.viser",        # Path to save .viser file (None = no recording)
)
Viser uses an in-process viser.ViserServer through newton.viewer.ViewerViser. bind_address
controls the network interface that the server listens on, while display_address controls only the
URL printed by Isaac Lab. On a remote machine, set display_address to the machine hostname/IP and
ensure the configured port is reachable from your browser. Set share=True to request Viser’s
public share/tunnel URL when that service is available.
Performance Note#
When visualizing large-scale environments, consider:
Using Newton instead of Omniverse or Rerun
Reducing window sizes
Lower update frequencies
Pausing visualizers while they are not being used
Limitations#
Rerun Visualizer Performance
The Rerun web-based visualizer may experience performance issues or crashes when visualizing large-scale
environments. For large-scale simulations, the Newton visualizer is recommended. Alternatively, to reduce load,
the num of environments can be overwritten and decreased using --num_envs:
uv run isaaclab train --rl_library rsl_rl --task Isaac-Cartpole --viz rerun --num_envs 512
./isaaclab.sh train --rl_library rsl_rl --task Isaac-Cartpole --viz rerun --num_envs 512
Rerun Visualizer FPS Control
The FPS control in the Rerun visualizer UI may not affect the visualization frame rate in all configurations.
Newton Contact Visualization
Newton’s native Show Contacts view can show all contacts from the Newton physics contact buffer. When running
with PhysX, the Newton visualizer can only show contacts reported by configured Isaac Lab contact sensors, so
currently the set of displayed contacts may differ across backends.
Viser Visualizer Renderer Requirement
The Viser visualizer requires a Newton model, which is provided automatically by
SceneDataProvider regardless of the active physics
backend or renderer. It is compatible with all rendering backends (RTX, Newton Warp, OVRTX).
Newton Visualizer CUDA/OpenGL Interoperability Warnings
On some system configurations, the Newton visualizer may display warnings about CUDA/OpenGL interoperability:
Warning: Could not get MSAA config, falling back to non-AA.
Warp CUDA error 999: unknown error (in function wp_cuda_graphics_register_gl_buffer)
Warp UserWarning: Could not register GL buffer since CUDA/OpenGL interoperability
is not available. Falling back to copy operations between the Warp array and the
OpenGL buffer.
The visualizer will still function correctly but may experience reduced performance due to falling back to CPU copy operations instead of direct GPU memory sharing.
Newton Visualizer OpenGL Context Failures
The Newton visualizer is an OpenGL window. If pyglet reports that
glCreateShader is not exported or that OpenGL 2.0 is required, the Python
process did not receive a usable OpenGL 2.0+ context from the active Windows or
Linux display session. This usually means the process is running in a
non-interactive/service session, through a remote desktop path without GPU
OpenGL acceleration, or with a software/basic OpenGL provider instead of the
NVIDIA driver. Run from a GPU-backed interactive display session, or omit
--visualizer newton_gl for headless inference.
Newton Visualizer on Spark with Conda
When running the Newton visualizer on Spark inside a conda environment, conda-installed X11 libraries may conflict with the system libraries required by pyglet, causing the following error:
pyglet.window.xlib.XlibException: Could not create UTF8 text property
To resolve this, remove the conflicting conda packages so that the system-provided libraries are used instead:
conda remove --force xorg-libx11 libxcb
Newton RTX Visualizer (Experimental)
The Newton RTX visualizer (--viz newton_rtx / NewtonRTXVisualizerCfg)
is currently experimental. Its path-traced LDR framebuffer is available through
render_rgb_array() and --video. Frame capture performs a GPU-to-CPU readback.
The following features are not yet supported and will be added in a future release:
Visualization markers — debug-draw geometry (
VisualizationMarkers) is skipped.Live plots — per-step scalar streaming (reward, episode length, manager terms) is disabled.
Streaming camera panel — the
streaming_viewoption has no display sink in the RTX viewer; useRerunVisualizerCfgorViserVisualizerCfgalongside Newton RTX for streaming output.Pause rendering — the path-tracer runs at full cost every tick even while paused (unlike GL’s lightweight update).
All of the above features are available in the Newton GL backend. Visualization markers, live
plots, and the streaming camera panel are also available in Rerun and Viser; however,
framebuffer-based video recording (--video with source="visualizer:*") is only
supported in Kit and Newton GL — use a sensor source (source="sensor:<name>") for
video recording with Rerun or Viser.
See Also#
Renderers — renderer backends (RTX, Newton Warp, OVRTX)
Scene Data Provider — how scene data flows from physics to visualizers
Newton Backend — Newton backend guide
Migrating to Isaac Lab 3.0 — migration guide for visualizer behavior