Setting up Isaac Teleop with CloudXR#
Isaac Teleop (NVIDIA/IsaacTeleop) is the unified framework for high-fidelity teleoperation in Isaac Lab. It provides standardized device interfaces, a flexible retargeting pipeline, and bundled NVIDIA CloudXR streaming for immersive XR-based teleoperation.
This guide walks you through setting up CloudXR, connecting an XR device, and running your first teleoperation session. For additional details see the Isaac Teleop Quick Start.
Tip
For architecture details, retargeting pipelines, control scheme recommendations, and how to add new embodiments or devices, see the Isaac Teleop page.
Prerequisites#
Isaac Lab installed and working (see Local Installation).
Isaac Lab workstation
Ubuntu 22.04 or Ubuntu 24.04
CPU: x86_64 (ARM support coming soon)
GPU: NVIDIA GPU required. For 45 FPS with 120 Hz physics:
CPU: AMD Ryzen Threadripper 7960x or higher
GPU: 1x RTX PRO 6000 (or equivalent, e.g. 1x RTX 5090) or higher
Memory: 64 GB RAM
For driver requirements see the Technical Requirements guide.
Python 3.12 or newer
CUDA 12.8 (recommended)
NVIDIA Driver 580.95.05 (recommended)
Wifi 6 capable router
A strong wireless connection is essential for a high-quality streaming experience. Refer to the CloudXR Network Setup guide for detailed requirements, router configuration, and troubleshooting.
We recommend a dedicated router; concurrent usage will degrade quality.
The XR device and Isaac Lab workstation must be IP-reachable from one another. Many institutional wireless networks prevent device-to-device connectivity.
Note
Teleoperation is not currently supported on DGX Spark.
Install Isaac Teleop#
Install the system libraries required by the CloudXR runtime:
sudo apt-get update && sudo apt-get install -y libvulkan1 libbsd0
The CloudXR runtime links against Vulkan at runtime. If your system already has the NVIDIA driver installed,
libvulkan1may already be present.isaacteleopis installed automatically as a dependency ofisaaclab_teleop. No separate pip install step is required. For building from source or plugin development, see the Isaac Teleop GitHub.Configure the firewall to allow CloudXR traffic. The required ports depend on the client type.
For Apple native clients (CloudXR Framework):
# Signaling (use one based on connection mode)
sudo ufw allow 48010/tcp   # Standard mode
sudo ufw allow 48322/tcp   # Secure mode
# Video
sudo ufw allow 47998/udp
sudo ufw allow 48005/udp
sudo ufw allow 48008/udp
sudo ufw allow 48012/udp
# Input
sudo ufw allow 47999/udp
# Audio
sudo ufw allow 48000/udp
sudo ufw allow 48002/udp
For web clients (CloudXR.js via the built-in WSS proxy):
sudo ufw allow 49100/tcp   # Signaling (WebRTC)
sudo ufw allow 47998/udp   # Media stream
sudo ufw allow 48322/tcp   # WSS proxy (HTTPS)
For full network requirements and Windows firewall instructions, see the CloudXR Network Setup documentation.
Run Isaac Lab with CloudXR#
The CloudXR runtime launches automatically when a teleop script is started. No separate
terminal or source step is needed. Launch a teleoperation script directly:
./isaaclab.sh -p scripts/environments/teleoperation/teleop_se3_agent.py \
    --task IsaacContrib-PickPlace-GR1T2-WaistEnabled-Abs \
    --visualizer kit \
    --xr
Attention
First run — EULA acceptance required. On the first launch, Isaac Sim will prompt you to accept the NVIDIA Omniverse License Agreement before the simulation starts:
By installing or using Isaac Sim, I agree to the terms of NVIDIA OMNIVERSE LICENSE AGREEMENT
in https://docs.isaacsim.omniverse.nvidia.com/latest/common/NVIDIA_Omniverse_License_Agreement.html

Do you accept the EULA? (Yes/No):
Type Yes and press Enter to continue. If this prompt goes unnoticed the script
will appear to hang — check your terminal output if Isaac Sim does not start within a
few seconds.
Tip
The IsaacContrib-PickPlace-GR1T2-WaistEnabled-Abs task above uses hand tracking as its
input mode. Make sure your XR device has hand tracking enabled (optical hand tracking on
Quest 3, or the built-in hand tracking on Apple Vision Pro). Different tasks require
different input modes (motion controllers vs hand tracking) – see the
Choose a Control Scheme table for the full list.
To switch the CloudXR device profile at launch time (e.g. from Quest to Apple Vision Pro),
use the --cloudxr_env flag:
./isaaclab.sh -p scripts/environments/teleoperation/teleop_se3_agent.py \
    --task IsaacContrib-PickPlace-GR1T2-WaistEnabled-Abs \
    --visualizer kit \
    --xr \
    --cloudxr_env avp
For details on the shipped .env profiles and how to customise them, see
CloudXR Environment Profiles in the feature guide.
Then in the Isaac Sim UI:
Locate the panel named XR and choose the following options:
Selected Output Plugin: OpenXR
OpenXR Runtime: System OpenXR Runtime
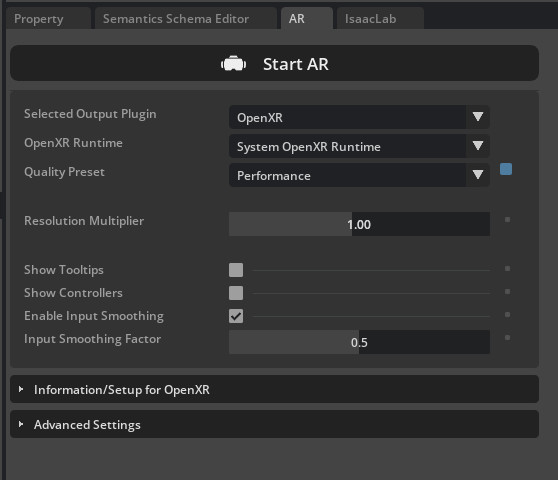
Click Start XR.
You should see “Waiting for connection” displayed in the status bar at the bottom of the viewport. The dual-eye stereo render only becomes active once a headset connects and playback begins on the device.
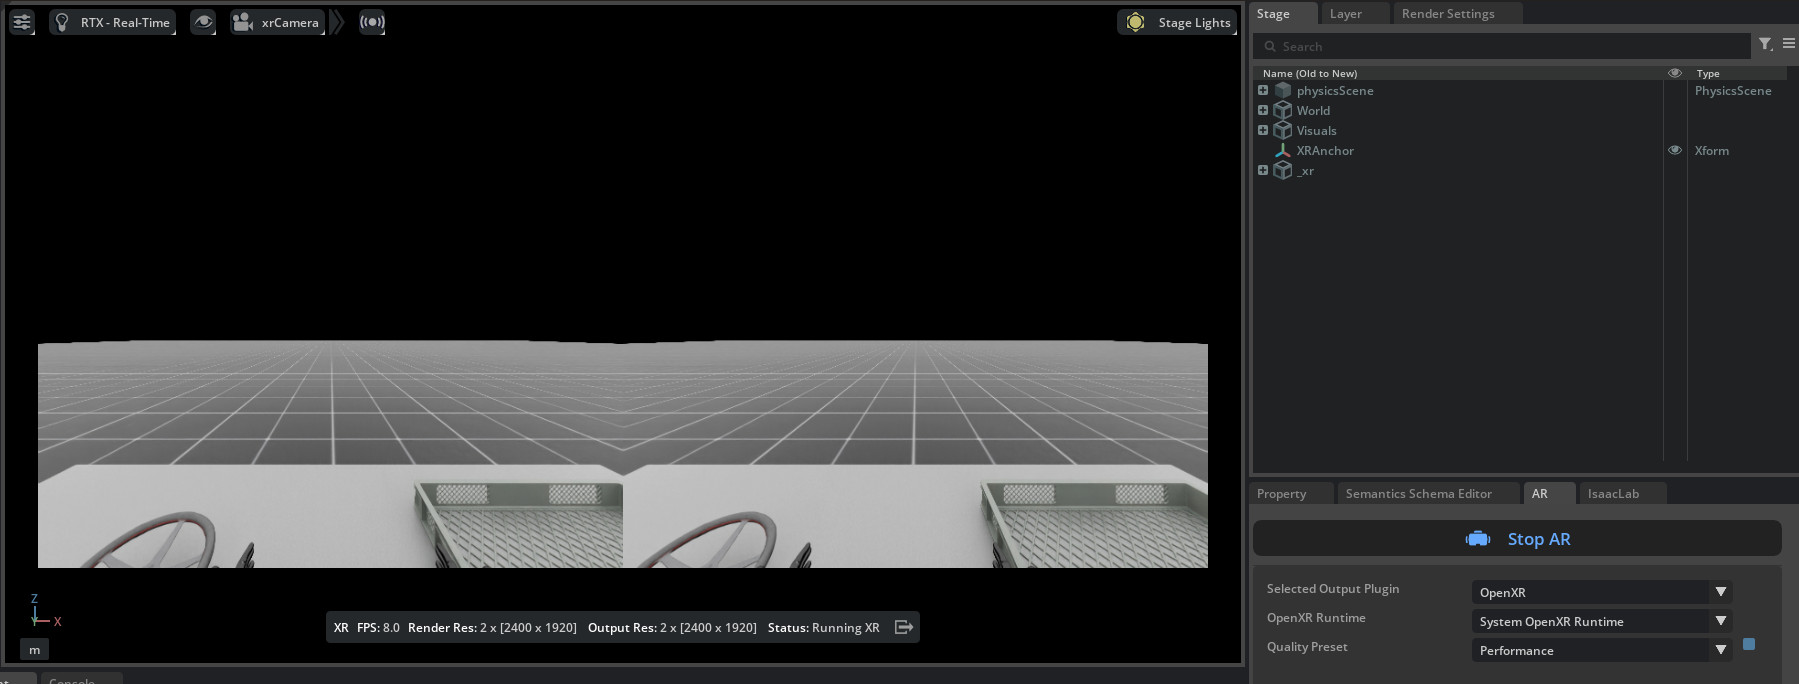
Isaac Lab is now ready to receive connections from a CloudXR client.
Connect an XR Device#
Isaac Teleop supports several XR headsets. You only need one of the devices below – choose the tab that matches your hardware.
Meta Quest 3 and Pico 4 Ultra connect to Isaac Lab via the
CloudXR.js
WebXR client. The built-in environments default to the cloudxrjs-cloudxr.env profile
(auto-webrtc), which is the correct setting for these devices.
Note
Pico 4 Ultra requires Pico OS 15.4.4U or later and must use HTTPS mode.
Launch the teleop script as shown in Run Isaac Lab with CloudXR. The CloudXR runtime and WSS proxy start automatically.
Open the browser on your headset and navigate to the hosted CloudXR.js client: https://nvidia.github.io/IsaacTeleop/client/release-1.3.x.
Note
The web client URL is versioned. The
release-1.3.xpath corresponds to the Isaac Teleop version Isaac Lab is pinned to (isaacteleop~=1.3.0in theteleopextra of the rootpyproject.toml). When Isaac Lab bumps its Isaac Teleop pin, update this link to the matching client release.Tip
For rapid development, you can test the CloudXR.js client on a desktop browser before deploying to headsets.
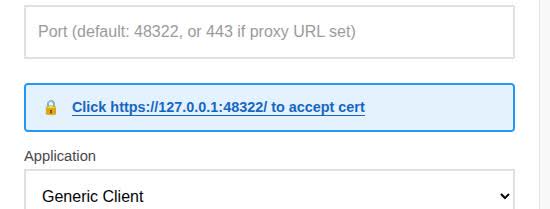
Enter the IP address of your Isaac Lab host machine in the Server IP field.
Because the WSS proxy uses a self-signed certificate, you must accept it before connecting. Click the Click https://<ip>:48322/ to accept cert link that appears on the page.
A new tab opens with a “Your connection is not private” warning. Click Advanced, then click Proceed to <ip> (unsafe).
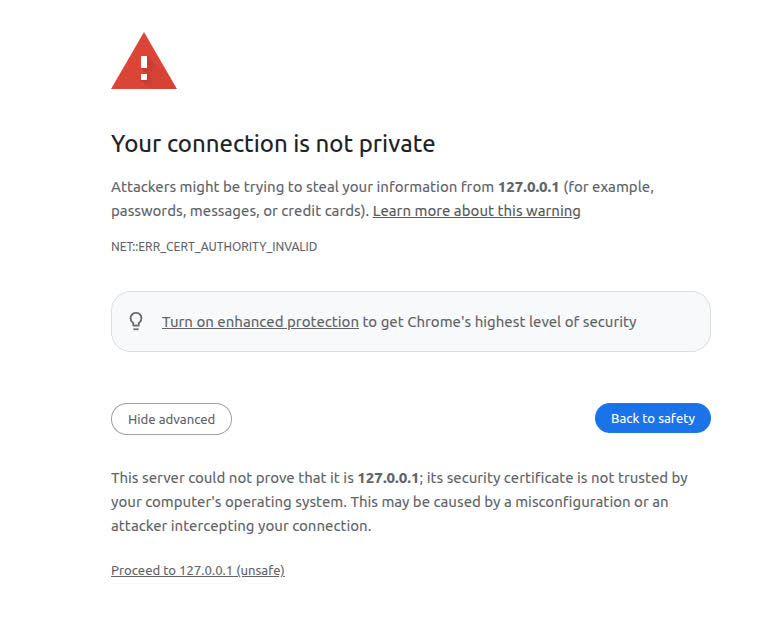
The browser will show a “Certificate Accepted” page confirming the certificate has been accepted. Close this tab and return to the CloudXR.js client page.

Click Connect to begin teleoperation.
For advanced configuration, troubleshooting, and additional details, see the CloudXR.js User Guide.
Apple Vision Pro connects to Isaac Lab via the native Isaac XR Teleop Sample Client app.
Important
Apple Vision Pro requires the auto-native device profile. Pass the avp
shorthand when launching the teleop script:
./isaaclab.sh -p scripts/environments/teleoperation/teleop_se3_agent.py \
    --task IsaacContrib-PickPlace-GR1T2-WaistEnabled-Abs \
    --visualizer kit --xr \
    --cloudxr_env avp
See CloudXR Environment Profiles for details on the shipped profiles.
Build and Install the Client App
Requirements:
Apple Vision Pro with visionOS 26, Apple M3 Pro chip (11-core CPU), 16 GB unified memory
Apple Silicon Mac with macOS Sequoia 15.6+ and Xcode 26.0
On your Mac:
Clone the Isaac XR Teleop Sample Client repository:
git clone git@github.com:isaac-sim/isaac-xr-teleop-sample-client-apple.git
Check out the version that matches your Isaac Lab version:
Isaac Lab Version
Client App Version
3.0
v3.0.0
2.3
v2.3.0
git checkout <client_app_version>
Follow the README in the repository to build and install the app on your Apple Vision Pro.
Teleoperate with Apple Vision Pro
Tip
Before wearing the headset, verify connectivity from your Mac:
nc -vz <isaac-lab-ip> 48010
Expected output: Connection to <ip> port 48010 [tcp/*] succeeded!
On your Isaac Lab workstation, ensure Isaac Lab and CloudXR are running as described in Run Isaac Lab with CloudXR.
On your Apple Vision Pro:
Open the Isaac XR Teleop Sample Client.
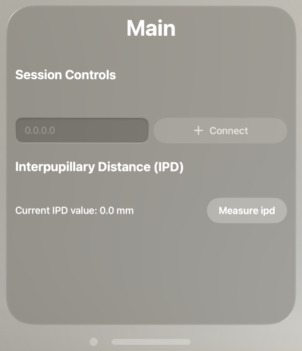
Enter the IP address of your Isaac Lab workstation and click Connect.
Note
The Apple Vision Pro and workstation must be IP-reachable from one another. We recommend a dedicated Wifi 6 router.
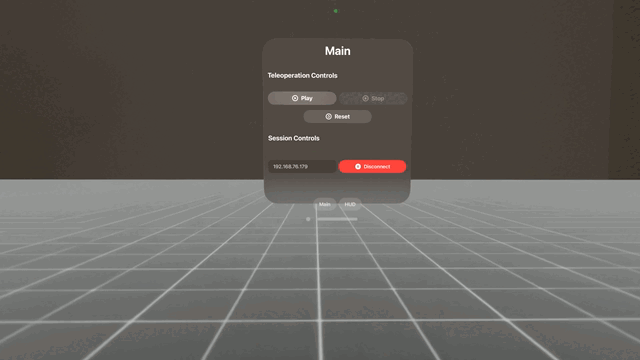
After a brief period you should see the simulation rendered in the headset along with teleoperation controls.
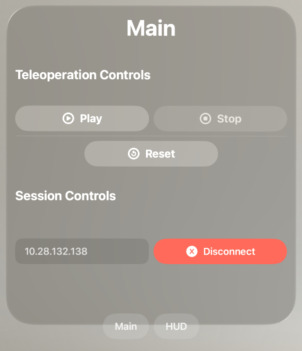
Click Play to begin teleoperating. Use Play, Stop, and Reset to control the session.
Tip
For bimanual tasks, visionOS voice control enables hands-free UI:
Settings > Accessibility > Voice Control > Turn on Voice Control
Enable <item name> under Commands > Basic Navigation
Say “Play”, “Stop”, or “Reset” while the app is connected.
Teleoperate the robot by moving your hands.
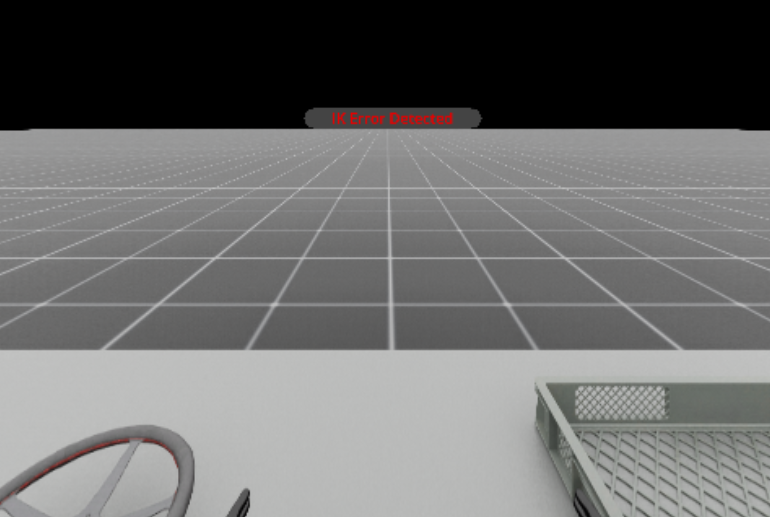
Note
If the IK solver fails, an error message appears in the headset. Click Reset to return the robot to its original pose and continue.
Click Disconnect when finished.
Manus Gloves#
Manus gloves provide high-fidelity finger tracking via the Manus SDK. This is useful when optical hand tracking from the headset is occluded or when higher-precision finger data is needed.
Important
Manus gloves and other external push-device peripherals require
NV_CXR_ENABLE_PUSH_DEVICES=1. The shipped .env profiles set this to 0
(optimised for headset optical hand tracking). To use Manus gloves, create a custom
.env file with the value set to 1 and pass it via --cloudxr_env:
# Copy a shipped profile and enable push devices
cp $(python -c "from isaaclab_teleop import CLOUDXR_JS_ENV; print(CLOUDXR_JS_ENV)") ~/manus.env
sed -i 's/NV_CXR_ENABLE_PUSH_DEVICES=0/NV_CXR_ENABLE_PUSH_DEVICES=1/' ~/manus.env

./isaaclab.sh -p scripts/environments/teleoperation/teleop_se3_agent.py \
    --task IsaacContrib-PickPlace-GR1T2-WaistEnabled-Abs \
    --visualizer kit --xr \
    --cloudxr_env ~/manus.env
See CloudXR Environment Profiles for full details on customising profiles.
Note
Manus glove support has been migrated into Isaac Teleop as a native plugin. The previous
isaac-teleop-device-plugins repository and the libsurvive-based Vive tracker integration
are no longer required.
Requirements:
Manus gloves with a Manus SDK license
The Manus plugin is included in the isaacteleop package and activated automatically when
configured in the environment’s retargeting pipeline. Manus tracking data flows through the same
API as headset-based optical hand tracking in Isaac Teleop, so the same retargeters and pipelines
work with both input sources.
For plugin configuration details, see the Manus plugin documentation.
The recommended workflow:
Start Isaac Lab and click Start XR.
Put on the Manus gloves and headset.
Use voice commands to launch the Isaac XR Teleop Sample Client and connect to Isaac Lab.
Run with Docker#
Teleoperation runs in a single container. Build the image yourself and run a single container. Do not use Docker Compose, which is a multi-container setup as we had in Isaac Lab 2.x. All components run inside one container with Isaac Lab in this release.
The CloudXR runtime auto-launches when a teleop script is started, so no separate runtime command is needed.
Attention
Recent Isaac Lab Docker images (3.0.0-beta2 and later) run as a non-root user
(uid/gid 1000). Persistent named volumes or host directories that were created by an
earlier root-based image are owned by root and are not writable by the runtime
user. The XR teleop workflow trips on this first, because it writes the extension
registry cache under the runtime home. The failure looks like:
[Error] [carb.scripting-python.plugin] PermissionError: [Errno 13] Permission denied: '/root/.local/share/ov/data/exts'
followed by a cascade of extension-registry errors that abort the app before the XR session can start:
[Error] [omni.ext.plugin] Syncing with extension registry unavailable.
[Error] [omni.ext.plugin] Failed to resolve extension dependencies. Failure hints:
  * No versions of omni.kit.xr.bundle.generic that satisfies: isaaclab.python.xr.openxr-3.0.0 ...
[Error] [omni.kit.app.plugin] Exiting app because of dependency solver failure...
The XR bundle is not actually missing – the registry never synced because its cache directory could not be created. To fix it, make the persistent storage writable by uid/gid 1000 before relaunching:
Docker Compose: recreate the named volumes, e.g.
docker compose --file docker-compose.yaml --profile base --env-file .env.base down --volumes
See Docker Guide for details. To preserve cached data instead of deleting it,
chownthe volume:docker run --rm -v docker_isaac-data:/data alpine chown -R 1000:1000 /data.Single container with bind mounts: pre-create the host directories and
sudo chown -R 1000:1000them before launching, so the non-root user can write to them.
Run the teleop script (e.g. record_demos.py to record demonstrations):
./isaaclab.sh -p scripts/tools/record_demos.py \
  --task IsaacContrib-PickPlace-Locomanipulation-G1-Abs \
  --num_demos 5 \
  --dataset_file ./datasets/dataset.hdf5 \
  --xr --visualizer kit
Then in the Isaac Sim UI, set the XR panel to System OpenXR Runtime and click Start XR.
For a fully headless experience, replace --visualizer kit with --visualizer none or
--viz none and the XR teleop session will run automatically.