Isaac Teleop#
Isaac Teleop is the unified framework for high-fidelity egocentric and robot data collection. It provides a standardized device interface, a flexible graph-based retargeting pipeline, and works seamlessly across simulated and real-world robots.
Isaac Teleop replaces the previous native XR teleop stack (isaaclab.devices.openxr) in Isaac
Lab. For migration details see Migrating to Isaac Lab 3.0.
Tip
Just want to get running? Follow the Setting up Isaac Teleop with CloudXR how-to guide for installation and first-run steps, then come back here for deeper topics.
Supported Devices#
Isaac Teleop supports multiple XR headsets and tracking peripherals. Each device provides different input modes, which determine which retargeters and control schemes are available.
Device |
Input Modes |
Client / Connection |
Notes |
|---|---|---|---|
Apple Vision Pro |
Hand tracking (26 joints), spatial controllers |
Native visionOS app (Isaac XR Teleop Sample Client) |
Build from source; see Build and Install the Client App |
Meta Quest 3 |
Motion controllers (triggers, thumbsticks, squeeze), hand tracking |
CloudXR.js WebXR client (browser) |
|
Pico 4 Ultra |
Motion controllers, hand tracking |
CloudXR.js WebXR client (browser) |
Requires Pico OS 15.4.4U+; must use HTTPS mode |
Manus Gloves |
High-fidelity finger tracking (Manus SDK) |
Isaac Teleop plugin (bundled) |
Migrated from the now-deprecated |
Choose a Control Scheme#
The right combination of input device and retargeters depends on your task. Use this table as a starting point, then see the detailed pipeline examples below.
Task Type |
Recommended Input |
Retargeters |
Action Dim |
Reference Config |
|---|---|---|---|---|
Manipulation (e.g. Franka) |
Motion controllers |
|
8 |
|
Bimanual dex + locomotion (e.g. G1 TriHand) |
Motion controllers |
Bimanual |
32 |
|
Bimanual dex, fixed base (e.g. G1) |
Motion controllers |
Bimanual |
28 |
|
Complex dex hand (e.g. GR1T2, G1 Inspire) |
Hand tracking / Manus gloves |
Bimanual |
36+ |
|
Why motion controllers for manipulation? Controllers provide precise spatial control via a grip pose and a physical trigger for gripper actuation, making them ideal for pick-and-place tasks.
Why hand tracking for complex dex hands? Hand tracking captures the full 26-joint hand pose required for high-fidelity dexterous retargeting. This is essential when individual finger control matters.
How It Works#
The IsaacTeleopDevice is the main integration point between Isaac Teleop
and Isaac Lab. It composes three collaborators:
XrAnchorManager – creates and synchronizes an XR anchor prim in the simulation, and computes the
world_T_anchortransform matrix that maps XR tracking data into the simulation coordinate frame.TeleopSessionLifecycle – builds the retargeting pipeline, acquires OpenXR handles from Isaac Sim’s XR bridge, creates the
TeleopSession, and steps it each frame to produce an action tensor.CommandHandler – lightweight callback registry for START / STOP / RESET commands. Scripts can register callbacks via
add_callback(), but the primary control path usespoll_control_events()(see Teleop Control States (Start / Stop / Reset)).
Session lifecycle details
The session uses deferred creation: if the user has not yet clicked “Start XR” in the Isaac
Sim UI, the session is not created immediately. Instead, each call to advance() retries
session creation until OpenXR handles become available. Once connected, advance() returns a
flattened action tensor (torch.Tensor) on the configured device. It returns None when
the session is not yet ready or has been torn down.
Teleop Control States (Start / Stop / Reset)#
Isaac Lab supports remote teleop control commands – start, stop, and reset – sent from the XR headset to the simulation. These are used to begin and end demonstration recording, pause the robot, or reset the environment without touching the simulation host.
How it works#
By default, every IsaacTeleopCfg enables a control message channel
using the well-known UUID uuid5(NAMESPACE_DNS, "teleop_command"). The channel is created as
a teleop_control_pipeline inside TeleopCore’s TeleopSession, which means:
A
MessageChannelSourceopens an OpenXR opaque data channel (XR_NV_opaque_data_channel) with the agreed-upon UUID.The CloudXR JS client (or any other client) discovers the channel by UUID and sends UTF-8 JSON commands:
{"type": "teleop_command", "message": {"command": "start teleop"}}
{"type": "teleop_command", "message": {"command": "stop teleop"}}
{"type": "teleop_command", "message": {"command": "reset teleop"}}
A
TeleopMessageProcessorparses these payloads and produces boolean pulse signals (run_toggle,kill,reset).DefaultTeleopStateManagerconsumes the boolean signals, runs its state machine (edge detection, fail-safe), and producesteleop_state(one-hot) andreset_event(bool pulse) outputs.TeleopCore decodes these outputs into
ExecutionEventsand injects them into every retargeter’sComputeContext, so stateful retargeters can react to state changes (e.g. reinitializing cross-step state on reset).
Polling control events in your script#
Use poll_control_events() to read the latest control state each frame:
from isaaclab_teleop import poll_control_events

with IsaacTeleopDevice(cfg) as device:
    running = False
    while sim_app.is_running():
        action = device.advance()

        ctrl = poll_control_events(device)
        if ctrl.is_active is not None:
            running = ctrl.is_active      # True after "start", False after "stop"
        if ctrl.should_reset:
            env.reset()                    # "reset" command received this frame

        if action is not None and running:
            env.step(action.repeat(num_envs, 1))
        else:
            env.sim.render()
ControlEvents has two fields:
is_active–Trueafter a “start” command,Falseafter “stop”,Nonewhen no command has been received yet (callers should leave their own flag unchanged).should_reset–Truefor exactly one frame after a “reset” command.
Disabling the control channel#
If you do not need headset-driven start/stop/reset (e.g. keyboard-only workflows), set
control_channel_uuid=None in your config:
IsaacTeleopCfg(
    pipeline_builder=_build_my_pipeline,
    control_channel_uuid=None,   # no opaque data channel created
)
Using a custom channel UUID#
To use a different channel UUID (e.g. for a separate control protocol), pass any 16-byte
bytes value:
import uuid

MY_UUID = uuid.uuid5(uuid.NAMESPACE_DNS, "my_custom_control").bytes

IsaacTeleopCfg(
    pipeline_builder=_build_my_pipeline,
    control_channel_uuid=MY_UUID,
)
The CloudXR JS client must be updated to discover this UUID when sending commands.
Retargeting Framework#
Isaac Teleop uses a graph-based retargeting pipeline. Data flows from source nodes through retargeters and is combined into a single action tensor.
Source Nodes#
HandsSource– provides hand tracking data (left/right, 26 joints each).ControllersSource– provides motion controller data (grip pose, trigger, thumbstick, etc.).
Available Retargeters#
Retargeters are provided by the isaacteleop package from the
Isaac Teleop repository. The retargeters listed below
are those used by the built-in Isaac Lab environments. Isaac Teleop may offer additional
retargeters not listed here – refer to the
Isaac Teleop repository for the full set.
Se3AbsRetargeter / Se3RelRetargeter
Maps hand or controller tracking to end-effector pose. Se3AbsRetargeter outputs a 7D
absolute pose (position + quaternion). Se3RelRetargeter outputs a 6D delta.
Configurable rotation offsets (roll, pitch, yaw in degrees).
GripperRetargeter
Outputs a single float (-1.0 closed, 1.0 open). Uses controller trigger (priority) or thumb-index pinch distance from hand tracking.
DexHandRetargeter / DexBiManualRetargeter
Retargets full hand tracking (26 joints) to robot-specific hand joint angles using the
dex-retargeting library. Requires a robot hand URDF and a YAML configuration file.
Warning
The links used for retargeting must be defined at the actual fingertips, not in the middle of the fingers, to ensure accurate optimization.
TriHandMotionControllerRetargeter
Maps VR controller buttons (trigger, squeeze) to G1 TriHand joints (7 DOF per hand). Simple mapping: trigger controls the index finger, squeeze controls the middle finger, and both together control the thumb.
LocomotionRootCmdRetargeter
Maps controller thumbsticks to a 4D locomotion command:
[vel_x, vel_y, rot_vel_z, hip_height].
TensorReorderer
Utility that flattens and reorders outputs from multiple retargeters into a single 1D action
tensor. The output_order must match the action space expected by the environment.
The built-in Isaac Lab environments use these retargeters as follows:
Environment |
Retargeters Used |
|---|---|
Franka manipulation (stack, pick-place) |
|
G1 Inspire dexterous pick-place |
|
GR1-T2 dexterous pick-place |
|
G1 upper-body (fixed base) |
|
G1 loco-manipulation |
|
Teleoperation Environment Reference#
The tables below list every built-in Isaac Lab environment that supports teleoperation,
organized by input method. Environments whose Task ID ends in -Play are designed for
closed-loop policy evaluation and are not included here.
Isaac Teleop (XR Headset) Environments#
These environments use the Isaac Teleop XR pipeline with motion controllers or hand tracking.
Task ID |
Input Mode |
Hands |
Operator Interaction |
|---|---|---|---|
|
Controllers |
Right |
Arm: right controller grip pose drives end-effector. Gripper: right trigger. |
|
Hand tracking |
Both |
Arms: left/right hand wrist pose drives each end-effector.
Hands: full 26-joint hand tracking retargeted to 11 DOF per Fourier hand via |
|
Hand tracking |
Both |
Same as |
|
Hand tracking |
Both |
Same retargeting pipeline as |
|
Hand tracking |
Both |
Same retargeting pipeline as |
|
Hand tracking |
Both |
Arms: left/right hand wrist pose drives each end-effector.
Hands: full 26-joint hand tracking retargeted to 12 DOF per Inspire hand via |
|
Controllers |
Both |
Arms: left/right controller grip pose drives each end-effector. Hands: trigger closes index, squeeze closes middle, both together close thumb (7 DOF TriHand per hand). |
|
Controllers |
Both |
Arms: same as fixed-base G1 above. Hands: same TriHand mapping. Locomotion: left thumbstick = linear velocity (x/y), right thumbstick X = rotational velocity, right thumbstick Y = hip height. |
Tip
Controllers provide a grip pose plus physical buttons (trigger, squeeze, thumbstick), ideal for tasks that need a gripper or simple hand mapping. Hand tracking captures 26 wrist and finger joints per hand, required for dexterous retargeting to complex robot hands.
Keyboard and SpaceMouse Environments#
Note
Keyboard and SpaceMouse teleoperation uses the legacy native Isaac Lab teleop stack
(isaaclab.devices), not Isaac Teleop. These environments do not require an XR headset.
The device button layouts below apply to all environments in this section. Per-environment differences (gripper enabled/disabled, sensitivity) are noted in the environment table that follows.
Keyboard
Function |
Keys |
Description |
|---|---|---|
Position X |
|
Move end-effector forward / backward. |
Position Y |
|
Move end-effector left / right. |
Position Z |
|
Move end-effector up / down. |
Roll |
|
Rotate about X axis. |
Pitch |
|
Rotate about Y axis. |
Yaw |
|
Rotate about Z axis. |
Gripper toggle |
|
Open / close gripper or suction (disabled in Reach envs). |
Reset |
|
Clear accumulated delta pose and gripper state. |
SpaceMouse
Function |
Control |
Description |
|---|---|---|
Translation |
6-DOF knob |
Push/pull/slide the knob to move the end-effector in X/Y/Z. |
Rotation |
6-DOF knob |
Tilt/twist the knob to rotate the end-effector in roll/pitch/yaw. |
Gripper toggle |
Left button |
Open / close gripper or suction (disabled in Reach envs). |
Reset |
Right button |
Clear accumulated delta pose and gripper state. |
Gamepad (Reach environments only)
Function |
Control |
Description |
|---|---|---|
Position X / Y |
Left stick |
Move end-effector forward/backward and left/right. |
Position Z |
Right stick (up/down) |
Move end-effector up / down. |
Roll / Pitch |
D-Pad |
Left/right for roll, up/down for pitch. |
Yaw |
Right stick (left/right) |
Rotate about Z axis. |
Gripper toggle |
X button |
Open / close gripper (disabled in Reach envs). |
Task ID |
Devices |
Operator Interaction |
|---|---|---|
|
Keyboard, SpaceMouse |
Arm: end-effector pose via RMPFlow.
Gripper: |
Note: With the RMPFlow controller, avoid colliding with the cubes during teleoperation: contact forces cause the controller to overtune and the arm to drift. Move the end-effector close to and just above the cube, stop, then close the suction cup. |
Keyboard, SpaceMouse |
Arm: end-effector pose via RMPFlow.
Suction: |
|
Keyboard, SpaceMouse |
Same as left-arm gripper above with camera observations. |
|
Keyboard, SpaceMouse |
Arm: left-arm end-effector pose via RMPFlow.
Gripper: |
|
Keyboard, SpaceMouse |
Arm: right-arm end-effector pose via RMPFlow.
Gripper: |
|
Keyboard, SpaceMouse |
Arm: relative IK end-effector control.
Suction: |
|
Keyboard, SpaceMouse |
Same as long-suction UR10 above with a shorter suction cup. |
|
Keyboard, Gamepad, SpaceMouse |
Arm: relative IK end-effector control. Gripper disabled. |
Note
Humanoid arms (e.g. Galbot, Agibot) have joint limits that inverse kinematics must respect. The differential IK controller ignores these limits, so RMPFlow is preferred for teleoperating them as it enforces joint limits while solving IK. Consequently, the arm may occasionally stop responding when the commanded target pose is unreachable within those limits – this is expected, not a bug.
Switch Between Controllers and Hand Tracking#
The retargeting pipeline determines whether an environment uses motion controllers or hand
tracking. Switching input modes requires changing the pipeline_builder function in your
environment config. No other environment-level changes are needed as long as the action
space (TensorReorderer output order) stays the same.
Controller to hand tracking
The key changes are:
Create a
HandsSourceand apply the world-to-anchor transform to it (instead ofControllersSource).Point the
Se3RetargeterConfig.input_deviceat the appropriateHandsSourcekey.Set
use_wrist_rotation=Trueanduse_wrist_position=Trueso that the SE3 retargeter reads from the hand wrist joint rather than the controller grip pose.The
GripperRetargeteralready supports both inputs – it uses the controller trigger when connected to aControllersSourceor thumb-index pinch when connected to aHandsSource.
Here is the Franka stack environment’s controller-based pipeline alongside a hand-tracking variant for comparison.
Original (controller-based):
# SE3: tracks right controller grip pose
se3_cfg = Se3RetargeterConfig(
    input_device=ControllersSource.RIGHT,
    use_wrist_rotation=False,
    use_wrist_position=False,
    target_offset_roll=90.0,
)
se3 = Se3AbsRetargeter(se3_cfg, name="ee_pose")
connected_se3 = se3.connect({
    ControllersSource.RIGHT: transformed_controllers.output(
        ControllersSource.RIGHT
    ),
})
Modified (hand-tracking-based):
se3_cfg = Se3RetargeterConfig(
    input_device=HandsSource.RIGHT,
    use_wrist_rotation=True,
    use_wrist_position=True,
    target_offset_roll=0.0,
)
se3 = Se3AbsRetargeter(se3_cfg, name="ee_pose")

transformed_hands = hands.transformed(transform_input.output(ValueInput.VALUE))
connected_se3 = se3.connect({
    HandsSource.RIGHT: transformed_hands.output(HandsSource.RIGHT),
})
The GripperRetargeter needs no changes – it accepts both controller and hand inputs and
uses whichever source is connected.
Hand tracking to controller
Reverse the steps above: set input_device to a ControllersSource key, transform the
controllers instead of the hands, and set use_wrist_rotation=False and
use_wrist_position=False. Adjust target_offset_roll/pitch/yaw to account for the
controller grip frame orientation (typically 90 degrees roll for Franka-style grippers).
Note
When switching between input modes, you may need to tune the target_offset_roll,
target_offset_pitch, and target_offset_yaw values. Controller grip frames and hand
wrist frames have different default orientations relative to the robot end-effector.
Build a Retargeting Pipeline#
A pipeline builder is a callable that constructs the retargeting graph and returns an
OutputCombiner with a single "action" key. Here is a complete example for a Franka
manipulator (from stack_ik_abs_env_cfg.py):
def _build_franka_stack_pipeline():
    from isaacteleop.retargeting_engine.deviceio_source_nodes import ControllersSource, HandsSource
    from isaacteleop.retargeting_engine.interface import OutputCombiner, ValueInput
    from isaacteleop.retargeters import (
        GripperRetargeter, GripperRetargeterConfig,
        Se3AbsRetargeter, Se3RetargeterConfig,
        TensorReorderer,
    )
    from isaacteleop.retargeting_engine.tensor_types import TransformMatrix

    # 1. Create input sources
    controllers = ControllersSource(name="controllers")
    hands = HandsSource(name="hands")

    # 2. Apply coordinate-frame transform (world_T_anchor provided by IsaacTeleopDevice)
    transform_input = ValueInput("world_T_anchor", TransformMatrix())
    transformed_controllers = controllers.transformed(
        transform_input.output(ValueInput.VALUE)
    )

    # 3. Create and connect retargeters
    se3_cfg = Se3RetargeterConfig(
        input_device=ControllersSource.RIGHT,
        target_offset_roll=90.0,
    )
    se3 = Se3AbsRetargeter(se3_cfg, name="ee_pose")
    connected_se3 = se3.connect({
        ControllersSource.RIGHT: transformed_controllers.output(ControllersSource.RIGHT),
    })

    gripper_cfg = GripperRetargeterConfig(hand_side="right")
    gripper = GripperRetargeter(gripper_cfg, name="gripper")
    connected_gripper = gripper.connect({
        ControllersSource.RIGHT: transformed_controllers.output(ControllersSource.RIGHT),
        HandsSource.RIGHT: hands.output(HandsSource.RIGHT),
    })

    # 4. Flatten into a single action tensor with TensorReorderer
    ee_elements = ["pos_x", "pos_y", "pos_z", "quat_x", "quat_y", "quat_z", "quat_w"]
    reorderer = TensorReorderer(
        input_config={
            "ee_pose": ee_elements,
            "gripper_command": ["gripper_value"],
        },
        output_order=ee_elements + ["gripper_value"],
        name="action_reorderer",
        input_types={"ee_pose": "array", "gripper_command": "scalar"},
    )
    connected_reorderer = reorderer.connect({
        "ee_pose": connected_se3.output("ee_pose"),
        "gripper_command": connected_gripper.output("gripper_command"),
    })

    # 5. Return OutputCombiner with "action" key
    return OutputCombiner({"action": connected_reorderer.output("output")})
Tip
The output_order of the TensorReorderer must match the action space of your environment.
Mismatches will cause silent control errors.
Configure Your Environment#
Register the pipeline in your environment configuration using IsaacTeleopCfg:
from isaaclab_teleop import IsaacTeleopCfg, XrCfg

@configclass
class MyTeleopEnvCfg(ManagerBasedRLEnvCfg):

    xr: XrCfg = XrCfg(anchor_pos=(0.5, 0.0, 0.5))

    def __post_init__(self):
        super().__post_init__()

        self.isaac_teleop = IsaacTeleopCfg(
            pipeline_builder=_build_my_pipeline,
            sim_device=self.sim.device,
            xr_cfg=self.xr,
        )
Key IsaacTeleopCfg fields:
pipeline_builder– callable that returns anOutputCombinerwith an"action"output.retargeters_to_tune– optional callable returning retargeters to expose in the live tuning UI.xr_cfg–XrCfgfor anchor configuration (see below).plugins– list of Isaac Teleop plugin configurations (e.g. Manus).sim_device– torch device string (default"cuda:0").retargeting_execution– IsaacTeleop retargeting execution settings. Defaults toRetargetingExecutionConfig(mode="pipelined")withDeadlinePacingConfig(safety_margin_s=0.025)so retargeting can run on the IsaacTeleop worker instead of blocking the simulation loop. The 25 ms safety margin staggers IsaacTeleop’s Python work behind Isaac Lab’s step Python, giving native work such as rendering time to overlap instead of having both Python stacks contend for the GIL at the start of the step.
Warning
pipeline_builder and retargeters_to_tune must be callables (functions or lambdas),
not pre-built objects. The @configclass decorator deep-copies mutable attributes, which
would break pre-built pipeline graphs.
CloudXR Environment Profiles#
Isaac Lab ships two .env profiles that configure the CloudXR runtime for different XR devices.
These are bundled inside the isaaclab_teleop package and can be referenced via constants:
Constant |
File |
|
|
|
|---|---|---|---|---|
|
|
|
|
|
|
|
|
|
|
Both profiles set NV_CXR_ENABLE_PUSH_DEVICES=0, which is correct for headset optical hand
tracking (the most common setup). For external push-device peripherals such as Manus gloves, set
this to 1 in a custom profile (see below).
They also set NV_ENABLE_POSE_WAIT=0 so CloudXR does not throttle the application when frame
times spike. This favors lower latency over CloudXR’s pose-wait smoothing.
Override at launch time#
The --cloudxr_env flag on teleop_se3_agent.py and record_demos.py selects which
.env profile to use. The default is cloudxrjs (Quest/Pico). Use the avp shorthand
for Apple Vision Pro, or pass a full file path for a custom profile:
# Use the AVP profile
./isaaclab.sh -p scripts/environments/teleoperation/teleop_se3_agent.py \
    --task IsaacContrib-PickPlace-GR1T2-WaistEnabled-Abs \
    --visualizer kit --xr \
    --cloudxr_env avp
Create a custom profile#
Copy a shipped profile and edit it:
# Start from the Quest/Pico profile
cp $(python -c "from isaaclab_teleop import CLOUDXR_JS_ENV; print(CLOUDXR_JS_ENV)") ~/my-cloudxr.env
Edit ~/my-cloudxr.env to change any values (e.g. NV_CXR_ENABLE_PUSH_DEVICES=1 for
Manus gloves), then pass it via --cloudxr_env ~/my-cloudxr.env.
Disable auto-launch#
If you prefer to run the CloudXR runtime manually in a separate terminal
(python -m isaacteleop.cloudxr), you can disable auto-launch in several ways:
CLI flag:
--no-auto_launch_cloudxron the teleop script.Disable CloudXR entirely:
--cloudxr_env none.Environment variable:
ISAACLAB_CXR_SKIP_AUTOLAUNCH=1overrides the CLI flag at runtime.
# Disable via CLI flag
./isaaclab.sh -p scripts/environments/teleoperation/teleop_se3_agent.py \
    --task IsaacContrib-PickPlace-GR1T2-WaistEnabled-Abs \
    --visualizer kit --xr \
    --no-auto_launch_cloudxr

# Or disable via environment variable
ISAACLAB_CXR_SKIP_AUTOLAUNCH=1 ./isaaclab.sh -p scripts/environments/teleoperation/teleop_se3_agent.py \
    --task IsaacContrib-PickPlace-GR1T2-WaistEnabled-Abs \
    --visualizer kit --xr
Configure the XR Anchor#
The XrCfg controls how the simulation is positioned and oriented in the
XR device’s view.
anchor_pos/anchor_rotStatic anchor placement. The simulation point at these coordinates appears at the XR device’s local origin (floor level). Set to a point on the floor beneath the robot to position it in front of the user.
anchor_prim_pathAttach the anchor to a USD prim for dynamic positioning. Use this for locomotion tasks where the robot moves and the XR camera should follow.
anchor_rotation_modeControls how anchor rotation behaves:
Mode
Description
FIXEDSets rotation once from
anchor_rot. Best for static manipulation setups.FOLLOW_PRIMRotation continuously tracks the attached prim. Best for locomotion where the user should face the robot’s heading direction.
FOLLOW_PRIM_SMOOTHEDSame as
FOLLOW_PRIMwith slerp interpolation. Controlled byanchor_rotation_smoothing_time(seconds, default 1.0). Reduces motion sickness from abrupt rotation changes. Typical range: 0.3–1.5 s.CUSTOMUser-provided callable
anchor_rotation_custom_func(headpose, primpose) -> quaternionfor fully custom logic.fixed_anchor_heightWhen
True(default), keeps the anchor height at its initial value. Prevents vertical bobbing during locomotion.near_planeClosest render distance for the XR device (default 0.15 m).
Note
On Apple Vision Pro, the local coordinate frame can be reset to a point on the floor beneath the user by holding the digital crown.
Tip
When using XR, call remove_camera_configs() on your env config to strip
camera sensors. Additional cameras cause GPU contention and degrade XR performance.
Record Demonstrations for Imitation Learning#
Isaac Teleop integrates with Isaac Lab’s record_demos.py script for recording teleoperated
demonstrations.
When your environment configuration has an isaac_teleop attribute, the script automatically
uses create_isaac_teleop_device() – no --teleop_device flag is needed:
./isaaclab.sh -p scripts/tools/record_demos.py \
    --task IsaacContrib-PickPlace-GR1T2-WaistEnabled-Abs \
    --visualizer kit \
    --xr
Some environments use the legacy teleop_devices configuration instead of isaac_teleop
(e.g. the Galbot RmpFlow relative-mode tasks). For these, pass --teleop_device to select
the input device:
./isaaclab.sh -p scripts/tools/record_demos.py \
    --task IsaacContrib-Stack-Cube-Galbot-Left-Arm-Gripper-RmpFlow \
    --visualizer kit \
    --teleop_device keyboard
The workflow is:
Configure your environment with
IsaacTeleopCfg(see Configure Your Environment) orteleop_devicesfor legacy devices (keyboard, spacemouse).Run
record_demos.pywith the task name.For XR tasks: start AR, connect your XR device, and teleoperate. For legacy tasks: use the configured input device directly.
Demonstrations are recorded to HDF5 files.
Use the recorded data with Isaac Lab Mimic or other imitation learning frameworks.
For the broader imitation learning pipeline (replay, augmentation, policy training), see Synthetic Data Generation and Imitation Learning with Isaac Lab Mimic.
Add a New Robot#
To add teleoperation support for a new robot in Isaac Lab:
Choose a control scheme. Refer to the Choose a Control Scheme table to determine which retargeters match your robot’s capabilities.
Build the pipeline. If existing retargeters are sufficient (e.g.
Se3AbsRetargeter+GripperRetargeterfor a new manipulator), write a pipeline builder function following the pattern in Build a Retargeting Pipeline. Configure theTensorReordereroutput order to match your environment’s action space.For dexterous hands: create a robot hand URDF and YAML config for
DexHandRetargeter. Ensure fingertip links are positioned at the actual fingertips, not mid-finger.For a custom retargeter: see Add a New Retargeter below.
Configure the XR anchor for your robot (static for manipulation, dynamic for locomotion). See Configure the XR Anchor.
Register in env config via
IsaacTeleopCfg(see Configure Your Environment).
Add a New Retargeter#
If the built-in retargeters do not cover your use case, you can implement a custom one in the Isaac Teleop repository:
Inherit from
BaseRetargeterand implementinput_spec(),output_spec(), andcompute().Optionally add a
ParameterStatefor parameters that should be live-tunable via the retargeter tuning UI.Connect to existing source nodes (
HandsSource,ControllersSource) or create a newIDeviceIOSourcesubclass for custom input devices.
See the Isaac Teleop repository and Contributing Guide for details.
Add a New Device#
There are two levels of device integration:
- Isaac Teleop plugin (C++ level)
For new hardware that requires a custom driver or SDK. Plugins push data via OpenXR tensor collections. Existing plugins include Manus gloves, OAK-D camera, controller synthetic hands, and foot pedals. After creating the plugin, update the retargeting pipeline config to consume data from the new plugin’s source node.
See the Plugins directory for examples.
- Pipeline configuration only
For devices already supported by Isaac Teleop (or whose data is available as hand / controller tracking). Simply update your
pipeline_builderto use the appropriate source nodes and retargeters for the device’s data format.
Optimize XR Performance#
Configure the physics and render time step
Ensure the simulation render time step roughly matches the XR device’s display rate and can
be sustained in real time. Quest 3 and Pico 4 Ultra typically run at 90 Hz, so we recommend a
simulation dt of 90 Hz with a render_interval of 2 (rendering at 45 Hz):
@configclass
class XrTeleopEnvCfg(ManagerBasedRLEnvCfg):

    def __post_init__(self):
        self.sim.dt = 1.0 / 90        # physics steps at 90 Hz
        self.sim.render_interval = 2  # one render per 2 physics steps -> 45 Hz
sim.render_interval is the number of physics simulation steps that occur between
renders. Increasing it reduces rendering frequency (and GPU cost) without changing physics
behavior – useful when physics can keep up but rendering cannot.
The choice of sim.dt is a trade-off between stability and performance: a smaller dt
(e.g. 1.0 / 120) integrates contacts more accurately and is more stable for stiff
contact-rich tasks, but each step costs more wall-clock time and lowers achievable frame
rate. A larger dt (e.g. 1.0 / 60) is cheaper but can introduce contact jitter or
instabilities. Pick the largest dt your task tolerates.
Switch the viewport to the RTX - Minimal renderer
The RTX - Minimal renderer trades image fidelity for substantially lower per-frame GPU cost.
It is the recommended choice when the simulation cannot sustain the XR device’s display rate
in real time – for example on lower-spec GPUs, in scenes with many lights or complex
materials, or when you have already configured sim.dt and sim.render_interval and
still see dropped frames.
Known issue
Starting an XR session while RTX - Minimal is already the active renderer is a known issue: robot control inputs may never be applied and teleoperation stays non-functional, with no error reported. Switching to RTX - Minimal after the XR session has started and teleoperation is confirmed working is not affected.
As a workaround, start under the default renderer before switching to RTX - Minimal:
Launch Isaac Lab with the default renderer and start the XR session.
Confirm that teleoperation is working (the robot responds to your hand motions).
Switch the viewport renderer to RTX - Minimal as described below.
To enable it, click the renderer dropdown at the top-left of the Isaac Lab viewport and select RTX - Minimal:
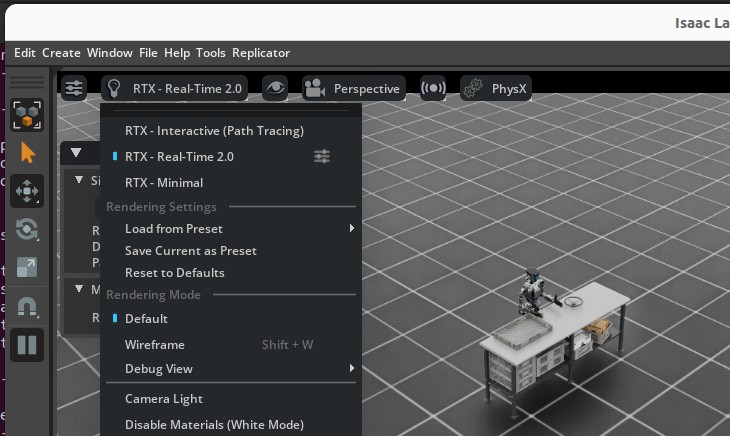
Selecting the RTX - Minimal renderer from the viewport dropdown.#
For best results, open Render Settings from the top-right of the Isaac Lab UI, switch to the Minimal tab, and set Minimal Shading Mode to Diffuse/Glossy/Emission:
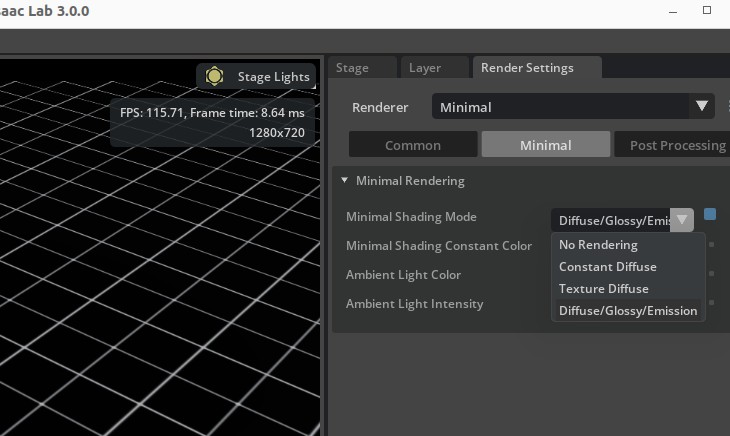
The Render Settings panel with the Minimal Shading Mode dropdown open (recommended: Diffuse/Glossy/Emission).#
Note
The RTX Minimal renderer currently only supports DistantLight prims for scene
illumination – DomeLight prims are ignored. If your environment uses a DomeLight,
swap (or supplement) it with a DistantLight so the scene is lit when running under
RTX Minimal:
import isaaclab.sim as sim_utils
from isaaclab.assets import AssetBaseCfg

light = AssetBaseCfg(
    prim_path="/World/light",
    spawn=sim_utils.DistantLightCfg(color=(0.75, 0.75, 0.75), intensity=3000.0),
)
Depending on your environment, the default DistantLight orientation may cast shadows
that overlap the robot and reduce visibility during teleoperation. If you encounter this,
adjust the light’s orientation via init_state on AssetBaseCfg
to position the light source at an angle that gives clear visibility:
import isaaclab.sim as sim_utils
from isaaclab.assets import AssetBaseCfg

light = AssetBaseCfg(
    prim_path="/World/light",
    spawn=sim_utils.DistantLightCfg(color=(0.75, 0.75, 0.75), intensity=3000.0),
    init_state=AssetBaseCfg.InitialStateCfg(
        rot=(0.0, 0.0, 0.0, 1.0),  # quaternion (x, y, z, w); adjust to reduce shadow overlap
    ),
)
Experiment with different orientations in your scene to find an angle that avoids shadow overlap on the robot. A slight tilt away from the camera viewpoint is a good starting point.
Lower the XR render resolution
The XR render resolution multiplier scales the size of the render buffers that are then upscaled to the headset’s recommended display resolution. Lowering it trades image sharpness for substantially lower per-frame GPU cost, which can help sustain real-time frame rates on lower-spec GPUs or in heavy scenes.
In the Isaac Lab UI, open the XR tab on the right-side panel, expand Advanced Settings -> Render Resolution, and drag the Resolution Multiplier slider:
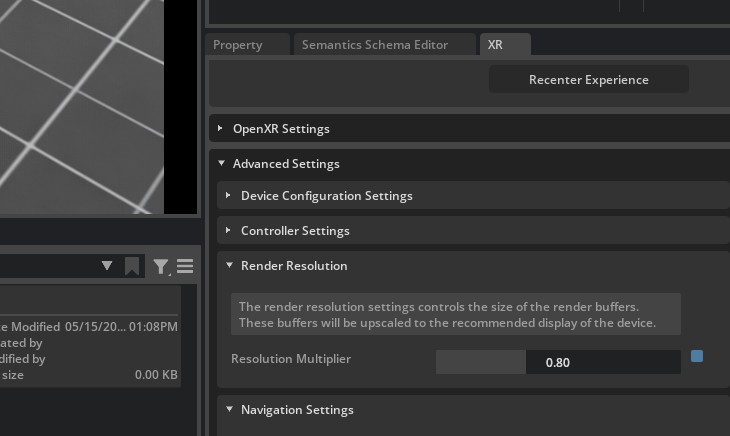
The Resolution Multiplier under XR -> Advanced Settings -> Render Resolution.
Values below 1.0 reduce the render-buffer size before upscaling to the headset.#
A value around 0.8 is usually a good starting point: noticeable GPU savings with minimal
perceptible quality loss. Reduce further only if you still cannot hit the headset’s display
rate.
Configure retargeting execution
Isaac Teleop can run retargeting either synchronously on the application thread or
asynchronously through a pipelined worker. This is controlled by
RetargetingExecutionConfig.
In synchronous mode, retargeting runs inline with the simulation step. This can be the best choice for lightweight retargeting or retargeting implemented mostly in Python, since a background Python worker can still contend with the application thread through the GIL.
In pipelined mode, Isaac Teleop submits retargeting work to a background worker and the application uses the most recent completed result. This is useful when retargeting has enough native work to overlap with simulation or rendering, or when the retargeting cost is large enough that running it inline would directly extend the frame.
retargeting_execution=RetargetingExecutionConfig(
    mode="pipelined",
    pacing=DeadlinePacingConfig(safety_margin_s=0.025),
)
DeadlinePacingConfig intentionally delays the background retargeting work until
closer to when the next result is needed, instead of starting it immediately when the
request is submitted. This helps avoid competing with the Python work Isaac Lab performs
at the beginning of the frame, and tends to line the retargeting work up with rendering
or other native work where overlap is more useful.
The safety_margin_s value controls how early retargeting starts before the predicted
deadline. A larger margin starts retargeting earlier, which gives heavier or more variable
retargeting work more time to finish before the next frame consumes the result. The
trade-off is that the input sample may be slightly older, and Python-heavy retargeting
may introduce more GIL contention.
If retargeting is mostly Python and lightweight, consider mode="sync". If retargeting
performs substantial native work or has occasional long spikes, use mode="pipelined"
and increase safety_margin_s so the work starts earlier.
Check CloudXR frame pacing
The CloudXR Runtime frame pacer attempts to keep the client experience smooth. If the application has repeated frame-time spikes, the pacer may settle at a lower stable frame rate instead of oscillating between rates. This can make a connected client appear slower even when Isaac Lab profiling does not show a proportional simulation-side regression.
The shipped CloudXR profiles set NV_ENABLE_POSE_WAIT=0 to mitigate this case, favoring lower
latency over pose-wait smoothing. If you use a custom .env file, copy that setting into the
custom profile, then point teleop_se3_agent.py or record_demos.py at it with
--cloudxr_env. See CloudXR Environment Profiles for the profile override workflow.
Known Issues#
XR_ERROR_VALIDATION_FAILURE: xrWaitFrame(frameState->type == 0)when stopping AR ModeCan be safely ignored. Caused by a race condition in the exit handler.
XR_ERROR_INSTANCE_LOST in xrPollEventOccurs if the CloudXR runtime exits before Isaac Lab. Restart the runtime to resume.
[omni.usd] TF_PYTHON_EXCEPTIONwhen starting/stopping AR ModeCan be safely ignored. Caused by a race condition in the enter/exit handler.
Invalid version string in _ParseVersionStringCaused by shader assets authored with older USD versions. Typically safe to ignore.
XR device connects but no video is displayed (viewport responds to tracking)
The GPU index may differ between host and container. Set
NV_GPU_INDEXto0,1, or2in the runtime to match the host GPU.
API Reference#
See the isaaclab_teleop for full class and function documentation:
ControlEventsSupportsControlEventspoll_control_events()TELEOP_CONTROL_CHANNEL_UUID