Interacting with a deformable object#
While deformable objects sometimes refer to a broader class of objects, such as cloths, fluids and soft bodies,
Isaac Lab represents deformable objects as either surface or volume deformables. Unlike rigid objects, soft bodies can
deform under external forces and collisions. In this tutorial, we focus on volume deformable bodies. For an example of
surface deformables (cloth), see the deformable demo at scripts/demos/deformables.py.
The deformable object API and schema define/modify functions are shared across backends, while deformable
property and material configuration classes are backend-specific. PhysX simulates soft bodies using the Finite
Element Method (FEM); the Newton experimental backend uses VBD-based deformable support from
isaaclab_contrib.deformable.
The volume deformable comprises of two tetrahedral meshes – a simulation mesh and a collision mesh. The simulation
mesh is used to simulate the deformations of the soft body, while the collision mesh is used to detect collisions
with other objects in the scene. For PhysX-specific details, please check the PhysX documentation.
This tutorial shows how to interact with a deformable object in the simulation. We will spawn a set of soft cubes and see how to set their nodal positions and velocities, along with apply kinematic commands to the mesh nodes to move the soft body.
The Code#
The tutorial corresponds to the run_deformable_object.py script in the scripts/tutorials/01_assets directory.
Code for run_deformable_object.py
  1# Copyright (c) 2022-2026, The Isaac Lab Project Developers (https://github.com/isaac-sim/IsaacLab/blob/main/CONTRIBUTORS.md).
  2# All rights reserved.
  3#
  4# SPDX-License-Identifier: BSD-3-Clause
  5
  6"""
  7This script demonstrates how to work with the deformable object and interact with it.
  8
  9.. code-block:: bash
 10
 11    # Usage
 12    ./isaaclab.sh -p scripts/tutorials/01_assets/run_deformable_object.py
 13
 14"""
 15
 16"""Launch Isaac Sim Simulator first."""
 17
 18import argparse
 19import os
 20
 21from isaaclab.app import AppLauncher
 22
 23# add argparse arguments
 24parser = argparse.ArgumentParser(description="Tutorial on interacting with a deformable object.")
 25parser.add_argument("--backend", type=str, default="physx", choices=["physx", "newton"], help="Physics backend.")
 26# append AppLauncher cli args
 27AppLauncher.add_app_launcher_args(parser)
 28# demos should open Kit visualizer by default
 29parser.set_defaults(visualizer=["kit"])
 30# parse the arguments
 31args_cli = parser.parse_args()
 32
 33# launch omniverse app
 34app_launcher = AppLauncher(args_cli)
 35simulation_app = app_launcher.app
 36
 37"""Rest everything follows."""
 38
 39import torch
 40
 41import isaaclab.sim as sim_utils
 42import isaaclab.utils.math as math_utils
 43from isaaclab.assets import DeformableObject, DeformableObjectCfg
 44
 45
 46def design_scene():
 47    """Designs the scene."""
 48    # Ground-plane
 49    cfg = sim_utils.GroundPlaneCfg()
 50    cfg.func("/World/defaultGroundPlane", cfg)
 51    # Lights
 52    cfg = sim_utils.DomeLightCfg(intensity=2000.0, color=(0.8, 0.8, 0.8))
 53    cfg.func("/World/Light", cfg)
 54
 55    # Create a dictionary for the scene entities
 56    scene_entities = {}
 57
 58    # Create separate groups called "env_0", "env_1", ...
 59    # Newton's scene loader requires the "env_\d+" naming convention to
 60    # detect per-environment Xforms and replicate them as separate worlds.
 61    origins = [[0.25, 0.25, 0.0], [-0.25, 0.25, 0.0], [0.25, -0.25, 0.0], [-0.25, -0.25, 0.0]]
 62    for i, origin in enumerate(origins):
 63        sim_utils.create_prim(f"/World/env_{i}", "Xform", translation=origin)
 64
 65    youngs_modulus = 1e5
 66    poissons_ratio = 0.4
 67    density = 500.0
 68    if args_cli.backend == "newton":
 69        from isaaclab_newton.sim.schemas import NewtonDeformableBodyPropertiesCfg
 70        from isaaclab_newton.sim.spawners.materials import NewtonDeformableBodyMaterialCfg
 71
 72        deformable_props = NewtonDeformableBodyPropertiesCfg()
 73        physics_material = NewtonDeformableBodyMaterialCfg(
 74            k_mu=youngs_modulus / (2.0 * (1.0 + poissons_ratio)),
 75            k_lambda=youngs_modulus * poissons_ratio / ((1.0 + poissons_ratio) * (1.0 - 2.0 * poissons_ratio)),
 76            density=density,
 77        )
 78    else:
 79        from isaaclab_physx.sim.schemas import PhysxDeformableBodyPropertiesCfg
 80        from isaaclab_physx.sim.spawners.materials import PhysxDeformableBodyMaterialCfg
 81
 82        deformable_props = PhysxDeformableBodyPropertiesCfg(rest_offset=0.0, contact_offset=0.001)
 83        physics_material = PhysxDeformableBodyMaterialCfg(
 84            poissons_ratio=poissons_ratio, youngs_modulus=youngs_modulus, density=density
 85        )
 86
 87    # 3D Deformable Object
 88    cfg = DeformableObjectCfg(
 89        prim_path="/World/env_.*/Cube",
 90        spawn=sim_utils.MeshCuboidCfg(
 91            size=(0.2, 0.2, 0.2),
 92            deformable_props=deformable_props,
 93            visual_material=sim_utils.PreviewSurfaceCfg(diffuse_color=(0.5, 0.1, 0.0)),
 94            physics_material=physics_material,
 95        ),
 96        init_state=DeformableObjectCfg.InitialStateCfg(pos=(0.0, 0.0, 1.0)),
 97        debug_vis=True,
 98    )
 99
100    cube_object = DeformableObject(cfg=cfg)
101    scene_entities["cube_object"] = cube_object
102
103    # return the scene information
104    return scene_entities, origins
105
106
107def run_simulator(sim: sim_utils.SimulationContext, entities: dict, origins: torch.Tensor, output_dir: str):
108    """Runs the simulation loop."""
109    # Extract scene entities
110    # note: we only do this here for readability. In general, it is better to access the entities directly from
111    #   the dictionary. This dictionary is replaced by the InteractiveScene class in the next tutorial.
112    cube_object: DeformableObject = entities["cube_object"]
113
114    # Define simulation stepping
115    sim_dt = sim.get_physics_dt()
116    sim_time = 0.0
117    count = 0
118
119    # Nodal kinematic targets of the deformable bodies
120    nodal_kinematic_target = cube_object.data.nodal_kinematic_target.torch.clone()
121
122    # Simulate physics
123    while simulation_app.is_running():
124        # reset at start and after 3 seconds
125        if count % int(3.0 / sim_dt) == 0:
126            # reset counters
127            count = 0
128
129            # reset the nodal state of the object
130            nodal_state = cube_object.data.default_nodal_state_w.torch.clone()
131            # apply random pose to the object
132            pos_w = torch.rand(cube_object.num_instances, 3, device=sim.device) * 0.1 + origins
133            quat_w = math_utils.random_orientation(cube_object.num_instances, device=sim.device)
134            nodal_state[..., :3] = cube_object.transform_nodal_pos(nodal_state[..., :3], pos_w, quat_w)
135
136            # write nodal state to simulation
137            cube_object.write_nodal_state_to_sim_index(nodal_state)
138
139            # Write the nodal state to the kinematic target and free all vertices
140            nodal_kinematic_target[..., :3] = nodal_state[..., :3]
141            nodal_kinematic_target[..., 3] = 1.0
142            cube_object.write_nodal_kinematic_target_to_sim_index(nodal_kinematic_target)
143
144            # reset buffers
145            cube_object.reset()
146
147            print("----------------------------------------")
148            print("[INFO]: Resetting object state...")
149
150        # update the kinematic target for cubes at index 0 and 3
151        kinematic_cubes = [0, 3]
152        # we slightly move the cube in the z-direction by picking the vertex at index 0
153        nodal_kinematic_target[kinematic_cubes, 0, 2] += 0.2 * sim_dt
154        # set vertex at index 0 to be kinematically constrained
155        # 0: constrained, 1: free
156        nodal_kinematic_target[kinematic_cubes, 0, 3] = 0.0
157        # write kinematic target to simulation
158        cube_object.write_nodal_kinematic_target_to_sim_index(nodal_kinematic_target)
159
160        # write internal data to simulation
161        cube_object.write_data_to_sim()
162        # perform step
163        sim.step()
164        # update sim-time
165        sim_time += sim_dt
166        count += 1
167        # update buffers
168        cube_object.update(sim_dt)
169
170        # print the root positions every second
171        if count % int(1.0 / sim_dt) == 0:
172            print(f"Time {sim_time:.2f}s: \tRoot position (in world): {cube_object.data.root_pos_w.torch[:, :3]}")
173
174
175def main():
176    """Main function."""
177    # Load kit helper
178    if args_cli.backend == "newton":
179        from isaaclab_newton.physics import NewtonCfg
180
181        from isaaclab_contrib.deformable.newton_manager_cfg import VBDSolverCfg
182
183        physics_cfg = NewtonCfg(solver_cfg=VBDSolverCfg(iterations=10), num_substeps=4)
184    else:
185        from isaaclab_physx.physics import PhysxCfg
186
187        physics_cfg = PhysxCfg()
188    sim_cfg = sim_utils.SimulationCfg(dt=0.01, device=args_cli.device, physics=physics_cfg)
189    sim = sim_utils.SimulationContext(sim_cfg)
190    # Set main camera
191    sim.set_camera_view(eye=[2.0, 2.0, 2.0], target=[0.0, 0.0, 0.75])
192    # Design scene
193    scene_entities, scene_origins = design_scene()
194    scene_origins = torch.tensor(scene_origins, device=sim.device)
195    # Play the simulator
196    sim.reset()
197    # Now we are ready!
198    print("[INFO]: Setup complete...")
199    # Run the simulator
200    camera_output = os.path.join(os.path.dirname(os.path.realpath(__file__)), "output", "camera")
201    run_simulator(sim, scene_entities, scene_origins, camera_output)
202    print("[INFO]: Simulation complete...")
203
204
205if __name__ == "__main__":
206    # run the main function
207    main()
208    # close sim app
209    simulation_app.close()
The Code Explained#
Designing the scene#
Similar to the Interacting with a rigid object tutorial, we populate the scene with a ground plane
and a light source. In addition, we add a deformable object to the scene using the assets.DeformableObject
class. This class is responsible for spawning the prims at the input path and initializes their corresponding
deformable body physics handles.
In this tutorial, we create a cubical soft object using the spawn configuration similar to the deformable cube
in the Spawn Objects tutorial. The only difference is that now we wrap
the spawning configuration into the assets.DeformableObjectCfg class. This class contains information about
the asset’s spawning strategy and default initial state. When this class is passed to
the assets.DeformableObject class, it spawns the object and initializes the corresponding physics handles
when the simulation is played.
Note
Deformable objects require a mesh object to be spawned with backend-specific deformable body physics
properties and a matching deformable physics material.
Use --backend physx for the PhysX implementation or --backend newton for the experimental Newton
implementation.
As seen in the rigid body tutorial, we can spawn the deformable object into the scene in a similar fashion by creating
an instance of the assets.DeformableObject class by passing the configuration object to its constructor.
    # Create separate groups called "env_0", "env_1", ...
    # Newton's scene loader requires the "env_\d+" naming convention to
    # detect per-environment Xforms and replicate them as separate worlds.
    origins = [[0.25, 0.25, 0.0], [-0.25, 0.25, 0.0], [0.25, -0.25, 0.0], [-0.25, -0.25, 0.0]]
    for i, origin in enumerate(origins):
        sim_utils.create_prim(f"/World/env_{i}", "Xform", translation=origin)

    youngs_modulus = 1e5
    poissons_ratio = 0.4
    density = 500.0
    if args_cli.backend == "newton":
        from isaaclab_newton.sim.schemas import NewtonDeformableBodyPropertiesCfg
        from isaaclab_newton.sim.spawners.materials import NewtonDeformableBodyMaterialCfg

        deformable_props = NewtonDeformableBodyPropertiesCfg()
        physics_material = NewtonDeformableBodyMaterialCfg(
            k_mu=youngs_modulus / (2.0 * (1.0 + poissons_ratio)),
            k_lambda=youngs_modulus * poissons_ratio / ((1.0 + poissons_ratio) * (1.0 - 2.0 * poissons_ratio)),
            density=density,
        )
    else:
        from isaaclab_physx.sim.schemas import PhysxDeformableBodyPropertiesCfg
        from isaaclab_physx.sim.spawners.materials import PhysxDeformableBodyMaterialCfg

        deformable_props = PhysxDeformableBodyPropertiesCfg(rest_offset=0.0, contact_offset=0.001)
        physics_material = PhysxDeformableBodyMaterialCfg(
            poissons_ratio=poissons_ratio, youngs_modulus=youngs_modulus, density=density
        )

    # 3D Deformable Object
    cfg = DeformableObjectCfg(
        prim_path="/World/env_.*/Cube",
        spawn=sim_utils.MeshCuboidCfg(
            size=(0.2, 0.2, 0.2),
            deformable_props=deformable_props,
            visual_material=sim_utils.PreviewSurfaceCfg(diffuse_color=(0.5, 0.1, 0.0)),
            physics_material=physics_material,
        ),
        init_state=DeformableObjectCfg.InitialStateCfg(pos=(0.0, 0.0, 1.0)),
        debug_vis=True,
    )

    cube_object = DeformableObject(cfg=cfg)
Running the simulation loop#
Continuing from the rigid body tutorial, we reset the simulation at regular intervals, apply kinematic commands to the deformable body, step the simulation, and update the deformable object’s internal buffers.
Resetting the simulation state#
Unlike rigid bodies and articulations, deformable objects have a different state representation. The state of a
deformable object is defined by the nodal positions and velocities of the mesh. The nodal positions and velocities
are defined in the simulation world frame and are stored in the assets.DeformableObject.data attribute.
We use the assets.DeformableObject.data.default_nodal_state_w attribute to get the default nodal state of the
spawned object prims. This default state can be configured from the assets.DeformableObjectCfg.init_state
attribute, which we left as identity in this tutorial.
Attention
The initial state in the configuration assets.DeformableObjectCfg specifies the pose
of the deformable object at the time of spawning. Based on this initial state, the default nodal state is
obtained when the simulation is played for the first time.
We apply transformations to the nodal positions to randomize the initial state of the deformable object.
            # reset the nodal state of the object
            nodal_state = cube_object.data.default_nodal_state_w.torch.clone()
            # apply random pose to the object
            pos_w = torch.rand(cube_object.num_instances, 3, device=sim.device) * 0.1 + origins
            quat_w = math_utils.random_orientation(cube_object.num_instances, device=sim.device)
            nodal_state[..., :3] = cube_object.transform_nodal_pos(nodal_state[..., :3], pos_w, quat_w)
To reset the deformable object, we first set the nodal state by calling the assets.DeformableObject.write_nodal_state_to_sim()
method. This method writes the nodal state of the deformable object prim into the simulation buffer.
Additionally, we free all the kinematic targets set for the nodes in the previous simulation step by calling
the assets.DeformableObject.write_nodal_kinematic_target_to_sim() method. We explain the
kinematic targets in the next section.
Finally, we call the assets.DeformableObject.reset() method to reset any internal buffers and caches.
            # write nodal state to simulation
            cube_object.write_nodal_state_to_sim_index(nodal_state)

            # Write the nodal state to the kinematic target and free all vertices
            nodal_kinematic_target[..., :3] = nodal_state[..., :3]
            nodal_kinematic_target[..., 3] = 1.0
            cube_object.write_nodal_kinematic_target_to_sim_index(nodal_kinematic_target)

            # reset buffers
            cube_object.reset()
Stepping the simulation#
Deformable bodies support user-driven kinematic control where a user can specify position targets for some of the mesh nodes while the rest of the nodes are simulated by the active deformable solver. This partial kinematic control is useful for applications where the user wants to interact with the deformable object in a controlled manner.
In this tutorial, we apply kinematic commands to two out of the four cubes in the scene. We set the position targets for the node at index 0 (bottom-left corner) to move the cube along the z-axis.
At every step, we increment the kinematic position target for the node by a small value. Additionally,
we set the flag to indicate that the target is a kinematic target for that node in the simulation buffer.
These are set into the simulation buffer by calling the assets.DeformableObject.write_nodal_kinematic_target_to_sim()
method.
        # update the kinematic target for cubes at index 0 and 3
        kinematic_cubes = [0, 3]
        # we slightly move the cube in the z-direction by picking the vertex at index 0
        nodal_kinematic_target[kinematic_cubes, 0, 2] += 0.2 * sim_dt
        # set vertex at index 0 to be kinematically constrained
        # 0: constrained, 1: free
        nodal_kinematic_target[kinematic_cubes, 0, 3] = 0.0
        # write kinematic target to simulation
        cube_object.write_nodal_kinematic_target_to_sim_index(nodal_kinematic_target)
Similar to the rigid object and articulation, we perform the assets.DeformableObject.write_data_to_sim() method
before stepping the simulation. For deformable objects, this method does not apply any external forces to the object.
However, we keep this method for completeness and future extensions.
        # write internal data to simulation
        cube_object.write_data_to_sim()
Updating the state#
After stepping the simulation, we update the internal buffers of the deformable object prims to reflect their new state
inside the assets.DeformableObject.data attribute. This is done using the assets.DeformableObject.update() method.
At a fixed interval, we print the root position of the deformable object to the terminal. As mentioned earlier, there is no concept of a root state for deformable objects. However, we compute the root position as the average position of all the nodes in the mesh.
        # update buffers
        cube_object.update(sim_dt)

        # print the root positions every second
        if count % int(1.0 / sim_dt) == 0:
            print(f"Time {sim_time:.2f}s: \tRoot position (in world): {cube_object.data.root_pos_w.torch[:, :3]}")
The Code Execution#
Now that we have gone through the code, let’s run the script and see the result:
./isaaclab.sh -p scripts/tutorials/01_assets/run_deformable_object.py --visualizer kit
To run the same tutorial with the experimental Newton deformable backend:
./isaaclab.sh -p scripts/tutorials/01_assets/run_deformable_object.py --backend newton --visualizer kit
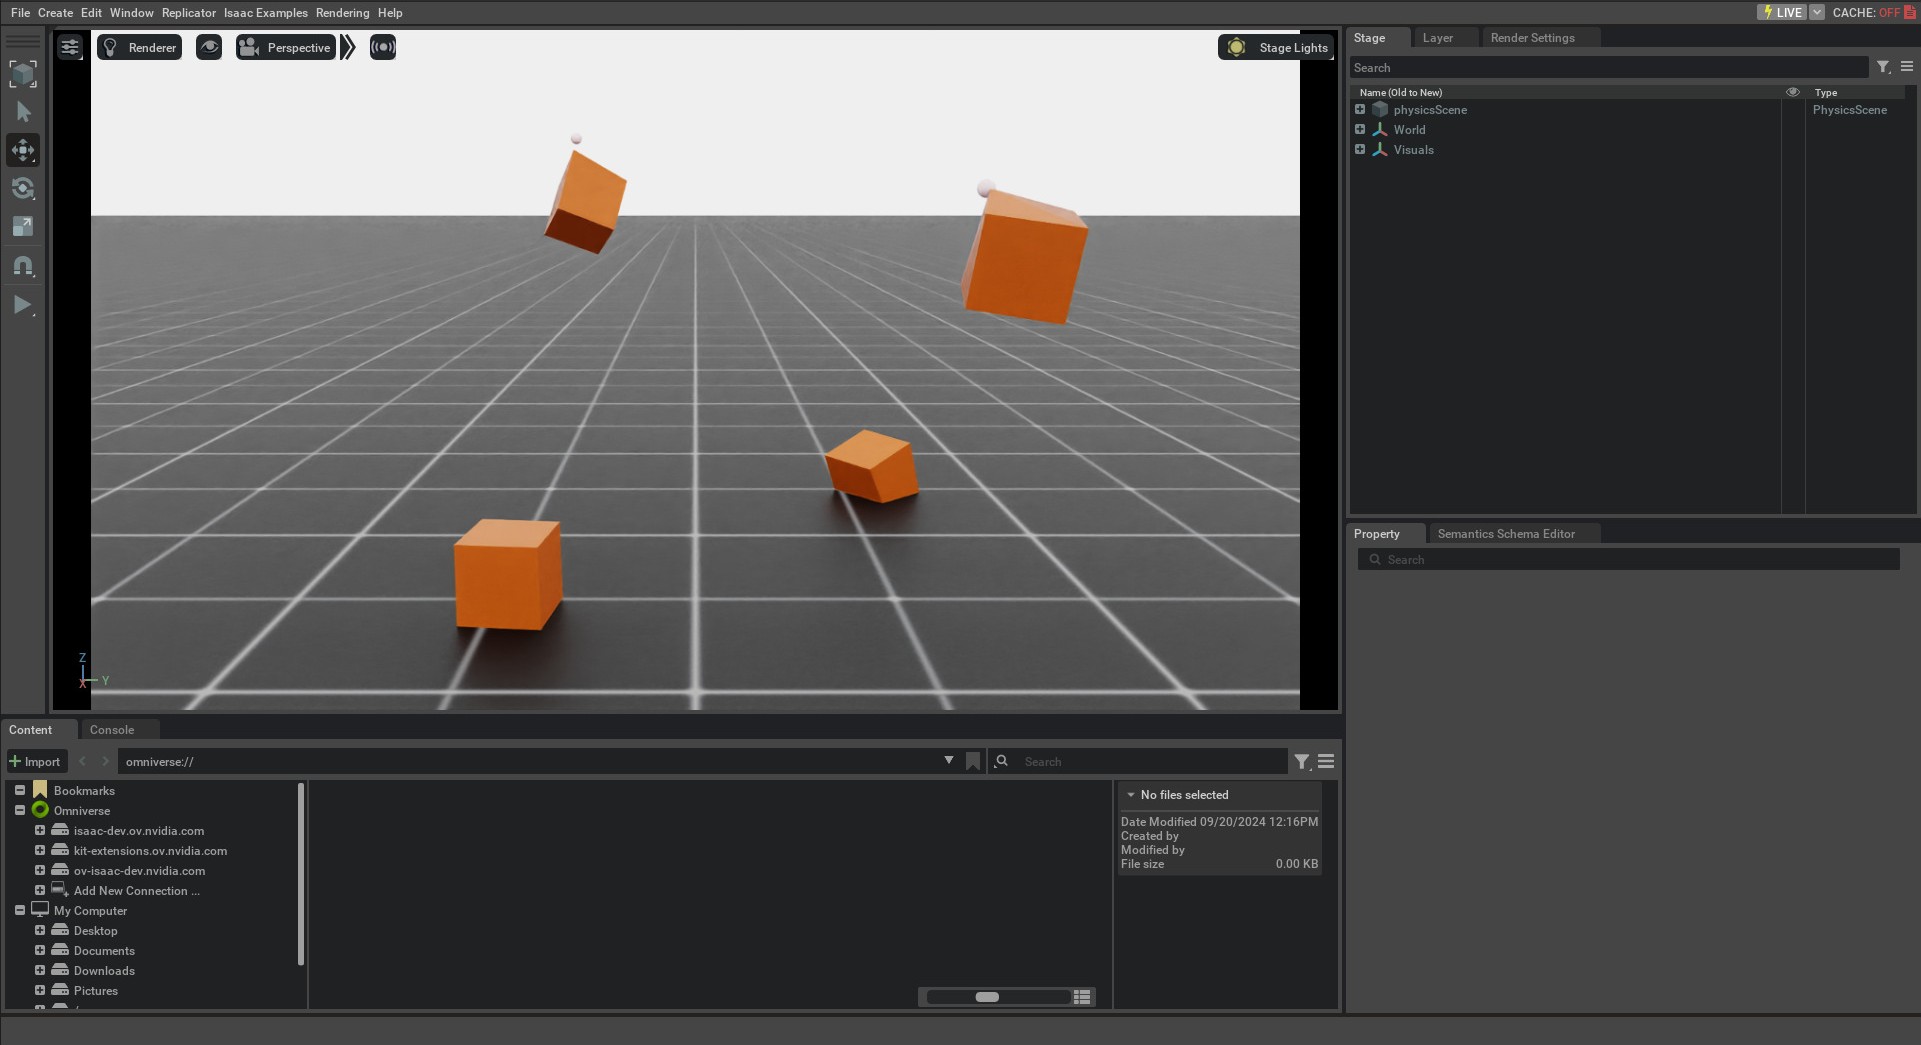
This should open a stage with a ground plane, lights, and several cubes. Two of the four cubes must be dropping
from a height and settling on to the ground. Meanwhile the other two cubes must be moving along the z-axis. You
should see a marker showing the kinematic target position for the nodes at the bottom-left corner of the cubes.
To stop the simulation, you can either close the window, or press Ctrl+C in the terminal
This tutorial showed how to spawn deformable objects and wrap them in a DeformableObject class to initialize their
physics handles which allows setting and obtaining their state. We also saw how to apply kinematic commands to the
deformable object to move the mesh nodes in a controlled manner. An advanced demo of deformable objects, including surface deformables and loading USD assets and applying deformable material on them, can be found in scripts/demos/deformables.py. In the next tutorial, we will see how to create
a scene using the InteractiveScene class.