Teleoperation Data Collection#
This workflow covers collecting demonstrations using Isaac Teleop with an XR device, supported by Nvidia IsaacTeleop.
Note
For supported IsaacTeleop hardware devices, see Supported Input Devices. Before starting teleoperation, also review the IsaacTeleop system requirements.
Important
A stable network connection meeting the CloudXR network requirements is required before starting the steps below.
Step 1: Start the CloudXR Runtime#
On the host machine, configure the firewall to allow CloudXR traffic.
sudo ufw allow 49100/tcp   # Signaling
sudo ufw allow 47998/udp   # Media stream
sudo ufw allow 48322/tcp   # Proxy (HTTPS mode only)
Start the CloudXR runtime from the Arena Docker container:
./docker/run_docker.sh
Create a CloudXR config to enable hand tracking:
echo "NV_CXR_ENABLE_PUSH_DEVICES=0" > handtracking.env
Start the CloudXR runtime with the customized config file:
python -m isaacteleop.cloudxr --cloudxr-env-config=handtracking.env
On the host machine, configure the firewall to allow CloudXR traffic.
# Signaling (use one based on connection mode)
sudo ufw allow 48010/tcp   # Standard mode
sudo ufw allow 48322/tcp   # Secure mode
# Video
sudo ufw allow 47998/udp
sudo ufw allow 48005/udp
sudo ufw allow 48008/udp
sudo ufw allow 48012/udp
# Input
sudo ufw allow 47999/udp
# Audio
sudo ufw allow 48000/udp
sudo ufw allow 48002/udp
Start the CloudXR runtime from the Arena Docker container:
./docker/run_docker.sh
Create a customized config file with the following content:
printf '%s\n' 'NV_DEVICE_PROFILE=auto-native' 'NV_CXR_ENABLE_PUSH_DEVICES=0' > avp.env
Start the CloudXR runtime with the customized config file:
python -m isaacteleop.cloudxr --cloudxr-env-config=avp.env
Attention
The first run will prompt users to accept the NVIDIA CloudXR License Agreement.
To accept the EULA, reply Yes when prompted with the below message:
NVIDIA CloudXR EULA must be accepted to run. View: https://github.com/NVIDIA/IsaacTeleop/blob/main/deps/cloudxr/CLOUDXR_LICENSE

Accept NVIDIA CloudXR EULA? [y/N]: Yes
Step 2: Start Recording#
In another terminal, start the Arena Docker container:
./docker/run_docker.sh
Run the following command to activate IsaacTeleop CloudXR environment settings:
source ~/.cloudxr/run/cloudxr.env
Important
Order matters. In the terminal where you will run Arena,
source ~/.cloudxr/run/cloudxr.envafter the CloudXR runtime from Step 1 is already running, and before you start the Arena app. The Arena app must inherit the IsaacTeleop CloudXR environment variables.Run the recording script:
python isaaclab_arena/scripts/imitation_learning/record_demos.py \
  --device cpu \
  --viz kit \
  --dataset_file $DATASET_DIR/arena_gr1_manipulation_dataset_recorded.hdf5 \
  --num_demos 10 \
  --num_success_steps 2 \
  gr1_open_microwave \
  --teleop_device openxr
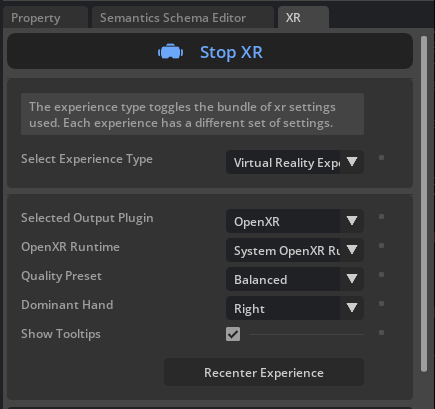
In the running application, start the session from the XR tab in the application window.
Step 3: Connect XR Device and Record#
For detailed instructions, refer to Connect an XR Device.
Note
Enable hand tracking on your Quest 3 headset for the first time:
Press the Meta button on your right controller to open the universal menu.
Select the clock on the left side of the universal menu to open Quick Settings.
Select Settings.
Select Movement tracking.
Select the toggle next to Hand and Body Tracking to turn this feature on.
Open the browser on your headset and navigate to https://nvidia.github.io/IsaacTeleop/client.
Enter the IP address of your Isaac Lab host machine in the Server IP field.
Click the Click https://<ip>:48322/ to accept cert link that appears on the page. Accept the certificate in the new page that opens, then navigate back to the CloudXR.js client page.
Click Connect to begin teleoperation.
Note
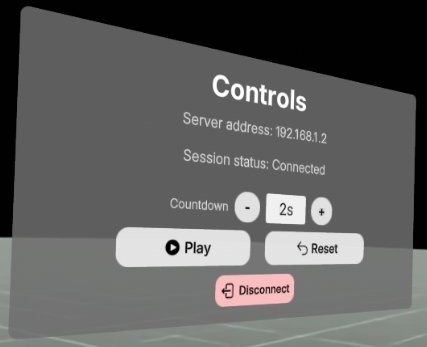
Once you press Connect in the web browser, you should see the following control panel. Press Play to start teleoperation.
If the control panel is not visible (for example, behind a solid wall in the simulated environment), you can put the headset on before clicking Start XR in the Isaac Lab Arena application, and drag the control panel to a better location.
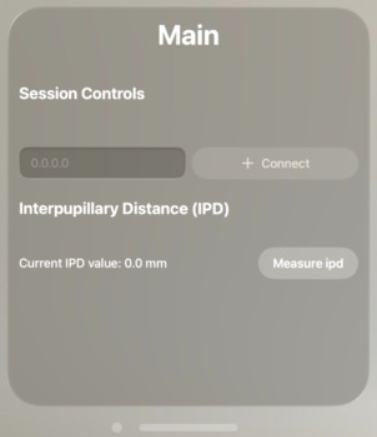
Connect your XR device to the CloudXR runtime. From Apple Vision Pro, launch the Isaac XR Teleop app.
Enter your workstation’s IP address and connect.
Note
Before proceeding with teleoperation and pressing Connect, move the CloudXR Controls Application window closer and to your left by pinching the bar at the bottom of the window. Without doing this, nearby objects will occlude the window, making it harder to interact with the controls.
CloudXR control panel—move this window to your left to avoid occlusion by nearby objects.#
Press the Connect button.
Wait for the connection (you should see the simulation in VR).

First person view after connecting to the simulation.#
Complete the task by opening the microwave door.
Your hands control the robot’s hands.
Your fingers control the robot’s fingers.
On task completion the environment will automatically reset.
You’ll need to repeat task completion
num_demostimes (set to 10 above).
The script will automatically save successful demonstrations to an HDF5 file
at $DATASET_DIR/arena_gr1_manipulation_dataset_recorded.hdf5.
Hint
For best results during the recording session:
Move slowly and smoothly
Keep hands within tracking volume
Ensure good lighting for hand tracking
Complete at least 10 successful demonstrations
Hint
Collecting a large dataset across several sittings? Record one HDF5 per session by varying
--dataset_file, then concatenate the per-session files with
Step 4b: Merge Multiple Recording Sessions (Optional). The merge script is task-agnostic and works for every
Arena teleop workflow.