Spawning prims into the scene#
This tutorial explores how to spawn various objects (or prims) into the scene in Isaac Lab from Python. It builds on the previous tutorial on running the simulator from a standalone script and demonstrates how to spawn a ground plane, lights, primitive shapes, and meshes from USD files.
The Code#
The tutorial corresponds to the spawn_prims.py script in the scripts/tutorials/00_sim directory.
Let’s take a look at the Python script:
Code for spawn_prims.py
  1# Copyright (c) 2022-2026, The Isaac Lab Project Developers (https://github.com/isaac-sim/IsaacLab/blob/main/CONTRIBUTORS.md).
  2# All rights reserved.
  3#
  4# SPDX-License-Identifier: BSD-3-Clause
  5
  6"""This script demonstrates how to spawn prims into the scene.
  7
  8.. code-block:: bash
  9
 10    # Usage
 11    ./isaaclab.sh -p scripts/tutorials/00_sim/spawn_prims.py
 12
 13"""
 14
 15"""Launch Isaac Sim Simulator first."""
 16
 17
 18import argparse
 19
 20from isaaclab.app import AppLauncher
 21
 22# create argparser
 23parser = argparse.ArgumentParser(description="Tutorial on spawning prims into the scene.")
 24# append AppLauncher cli args
 25AppLauncher.add_app_launcher_args(parser)
 26# parse the arguments
 27args_cli = parser.parse_args()
 28# launch omniverse app
 29app_launcher = AppLauncher(args_cli)
 30simulation_app = app_launcher.app
 31
 32"""Rest everything follows."""
 33
 34import isaaclab.sim as sim_utils
 35from isaaclab.utils.assets import ISAAC_NUCLEUS_DIR
 36
 37
 38def design_scene():
 39    """Designs the scene by spawning ground plane, light, objects and meshes from usd files."""
 40    # Ground-plane
 41    cfg_ground = sim_utils.GroundPlaneCfg()
 42    cfg_ground.func("/World/defaultGroundPlane", cfg_ground)
 43
 44    # spawn distant light
 45    cfg_light_distant = sim_utils.DistantLightCfg(
 46        intensity=3000.0,
 47        color=(0.75, 0.75, 0.75),
 48    )
 49    cfg_light_distant.func("/World/lightDistant", cfg_light_distant, translation=(1, 0, 10))
 50
 51    # create a new xform prim for all objects to be spawned under
 52    sim_utils.create_prim("/World/Objects", "Xform")
 53    # spawn a red cone
 54    cfg_cone = sim_utils.ConeCfg(
 55        radius=0.15,
 56        height=0.5,
 57        visual_material=sim_utils.PreviewSurfaceCfg(diffuse_color=(1.0, 0.0, 0.0)),
 58    )
 59    cfg_cone.func("/World/Objects/Cone1", cfg_cone, translation=(-1.0, 1.0, 1.0))
 60    cfg_cone.func("/World/Objects/Cone2", cfg_cone, translation=(-1.0, -1.0, 1.0))
 61
 62    # spawn a green cone with colliders and rigid body
 63    cfg_cone_rigid = sim_utils.ConeCfg(
 64        radius=0.15,
 65        height=0.5,
 66        rigid_props=sim_utils.RigidBodyPropertiesCfg(),
 67        mass_props=sim_utils.MassPropertiesCfg(mass=1.0),
 68        collision_props=sim_utils.CollisionPropertiesCfg(),
 69        visual_material=sim_utils.PreviewSurfaceCfg(diffuse_color=(0.0, 1.0, 0.0)),
 70    )
 71    cfg_cone_rigid.func(
 72        "/World/Objects/ConeRigid", cfg_cone_rigid, translation=(-0.2, 0.0, 2.0), orientation=(0.5, 0.0, 0.5, 0.0)
 73    )
 74
 75    # spawn a blue cuboid with deformable body
 76    cfg_cuboid_deformable = sim_utils.MeshCuboidCfg(
 77        size=(0.2, 0.5, 0.2),
 78        deformable_props=sim_utils.DeformableBodyPropertiesCfg(),
 79        visual_material=sim_utils.PreviewSurfaceCfg(diffuse_color=(0.0, 0.0, 1.0)),
 80        physics_material=sim_utils.DeformableBodyMaterialCfg(),
 81    )
 82    cfg_cuboid_deformable.func("/World/Objects/CuboidDeformable", cfg_cuboid_deformable, translation=(0.15, 0.0, 2.0))
 83
 84    # spawn a usd file of a table into the scene
 85    cfg = sim_utils.UsdFileCfg(usd_path=f"{ISAAC_NUCLEUS_DIR}/Props/Mounts/SeattleLabTable/table_instanceable.usd")
 86    cfg.func("/World/Objects/Table", cfg, translation=(0.0, 0.0, 1.05))
 87
 88
 89def main():
 90    """Main function."""
 91
 92    # Initialize the simulation context
 93    sim_cfg = sim_utils.SimulationCfg(dt=0.01, device=args_cli.device)
 94    sim = sim_utils.SimulationContext(sim_cfg)
 95    # Set main camera
 96    sim.set_camera_view([2.0, 0.0, 2.5], [-0.5, 0.0, 0.5])
 97    # Design scene
 98    design_scene()
 99    # Play the simulator
100    sim.reset()
101    # Now we are ready!
102    print("[INFO]: Setup complete...")
103
104    # Simulate physics
105    while simulation_app.is_running():
106        # perform step
107        sim.step()
108
109
110if __name__ == "__main__":
111    # run the main function
112    main()
113    # close sim app
114    simulation_app.close()
The Code Explained#
Scene designing in Omniverse is built around a software system and file format called USD (Universal Scene Description). It allows describing 3D scenes in a hierarchical manner, similar to a file system. Since USD is a comprehensive framework, we recommend reading the USD documentation to learn more about it.
For completeness, we introduce the must know concepts of USD in this tutorial.
Primitives (Prims): These are the basic building blocks of a USD scene. They can be thought of as nodes in a scene graph. Each node can be a mesh, a light, a camera, or a transform. It can also be a group of other prims under it.
Attributes: These are the properties of a prim. They can be thought of as key-value pairs. For example, a prim can have an attribute called
colorwith a value ofred.Relationships: These are the connections between prims. They can be thought of as pointers to other prims. For example, a mesh prim can have a relationship to a material prim for shading.
A collection of these prims, with their attributes and relationships, is called a USD stage. It can be thought of as a container for all prims in a scene. When we say we are designing a scene, we are actually designing a USD stage.
While working with direct USD APIs provides a lot of flexibility, it can be cumbersome to learn and use. To make it
easier to design scenes, Isaac Lab builds on top of the USD APIs to provide a configuration-driven interface to spawn prims
into a scene. These are included in the sim.spawners module.
When spawning prims into the scene, each prim requires a configuration class instance that defines the prim’s attributes and relationships (through material and shading information). The configuration class is then passed to its respective function where the prim name and transformation are specified. The function then spawns the prim into the scene.
At a high-level, this is how it works:
# Create a configuration class instance
cfg = MyPrimCfg()
prim_path = "/path/to/prim"

# Spawn the prim into the scene using the corresponding spawner function
spawn_my_prim(prim_path, cfg, translation=[0, 0, 0], orientation=[1, 0, 0, 0], scale=[1, 1, 1])
# OR
# Use the spawner function directly from the configuration class
cfg.func(prim_path, cfg, translation=[0, 0, 0], orientation=[1, 0, 0, 0], scale=[1, 1, 1])
In this tutorial, we demonstrate the spawning of various different prims into the scene. For more
information on the available spawners, please refer to the sim.spawners module in Isaac Lab.
Attention
All the scene designing must happen before the simulation starts. Once the simulation starts, we recommend keeping the scene frozen and only altering the properties of the prim. This is particularly important for GPU simulation as adding new prims during simulation may alter the physics simulation buffers on GPU and lead to unexpected behaviors.
Spawning a ground plane#
The GroundPlaneCfg configures a grid-like ground plane with
modifiable properties such as its appearance and size.
    # Ground-plane
    cfg_ground = sim_utils.GroundPlaneCfg()
    cfg_ground.func("/World/defaultGroundPlane", cfg_ground)
Spawning lights#
It is possible to spawn different light prims into the stage. These include distant lights, sphere lights, disk lights, and cylinder lights. In this tutorial, we spawn a distant light which is a light that is infinitely far away from the scene and shines in a single direction.
    # spawn distant light
    cfg_light_distant = sim_utils.DistantLightCfg(
        intensity=3000.0,
        color=(0.75, 0.75, 0.75),
    )
    cfg_light_distant.func("/World/lightDistant", cfg_light_distant, translation=(1, 0, 10))
Spawning primitive shapes#
Before spawning primitive shapes, we introduce the concept of a transform prim or Xform. A transform prim is a prim that contains only transformation properties. It is used to group other prims under it and to transform them as a group. Here we make an Xform prim to group all the primitive shapes under it.
    # create a new xform prim for all objects to be spawned under
    sim_utils.create_prim("/World/Objects", "Xform")
Next, we spawn a cone using the ConeCfg class. It is possible to specify
the radius, height, physics properties, and material properties of the cone. By default, the physics and material
properties are disabled.
The first two cones we spawn Cone1 and Cone2 are visual elements and do not have physics enabled.
    # spawn a red cone
    cfg_cone = sim_utils.ConeCfg(
        radius=0.15,
        height=0.5,
        visual_material=sim_utils.PreviewSurfaceCfg(diffuse_color=(1.0, 0.0, 0.0)),
    )
    cfg_cone.func("/World/Objects/Cone1", cfg_cone, translation=(-1.0, 1.0, 1.0))
    cfg_cone.func("/World/Objects/Cone2", cfg_cone, translation=(-1.0, -1.0, 1.0))
For the third cone ConeRigid, we add rigid body physics to it by setting the attributes for that in the configuration
class. Through these attributes, we can specify the mass, friction, and restitution of the cone. If unspecified, they
default to the default values set by USD Physics.
    # spawn a green cone with colliders and rigid body
    cfg_cone_rigid = sim_utils.ConeCfg(
        radius=0.15,
        height=0.5,
        rigid_props=sim_utils.RigidBodyPropertiesCfg(),
        mass_props=sim_utils.MassPropertiesCfg(mass=1.0),
        collision_props=sim_utils.CollisionPropertiesCfg(),
        visual_material=sim_utils.PreviewSurfaceCfg(diffuse_color=(0.0, 1.0, 0.0)),
    )
    cfg_cone_rigid.func(
        "/World/Objects/ConeRigid", cfg_cone_rigid, translation=(-0.2, 0.0, 2.0), orientation=(0.5, 0.0, 0.5, 0.0)
    )
Lastly, we spawn a cuboid CuboidDeformable which contains deformable body physics properties. Unlike the
rigid body simulation, a deformable body can have relative motion between its vertices. This is useful for simulating
soft bodies like cloth, rubber, or jello. It is important to note that deformable bodies are only supported in
GPU simulation and require a mesh object to be spawned with the deformable body physics properties.
    # spawn a blue cuboid with deformable body
    cfg_cuboid_deformable = sim_utils.MeshCuboidCfg(
        size=(0.2, 0.5, 0.2),
        deformable_props=sim_utils.DeformableBodyPropertiesCfg(),
        visual_material=sim_utils.PreviewSurfaceCfg(diffuse_color=(0.0, 0.0, 1.0)),
        physics_material=sim_utils.DeformableBodyMaterialCfg(),
    )
    cfg_cuboid_deformable.func("/World/Objects/CuboidDeformable", cfg_cuboid_deformable, translation=(0.15, 0.0, 2.0))
Spawning from another file#
Lastly, it is possible to spawn prims from other file formats such as other USD, URDF, or OBJ files. In this tutorial, we spawn a USD file of a table into the scene. The table is a mesh prim and has a material prim associated with it. All of this information is stored in its USD file.
    # spawn a usd file of a table into the scene
    cfg = sim_utils.UsdFileCfg(usd_path=f"{ISAAC_NUCLEUS_DIR}/Props/Mounts/SeattleLabTable/table_instanceable.usd")
    cfg.func("/World/Objects/Table", cfg, translation=(0.0, 0.0, 1.05))
The table above is added as a reference to the scene. In layman terms, this means that the table is not actually added
to the scene, but a pointer to the table asset is added. This allows us to modify the table asset and have the changes
reflected in the scene in a non-destructive manner. For example, we can change the material of the table without
actually modifying the underlying file for the table asset directly. Only the changes are stored in the USD stage.
Executing the Script#
Similar to the tutorial before, to run the script, execute the following command:
./isaaclab.sh -p scripts/tutorials/00_sim/spawn_prims.py
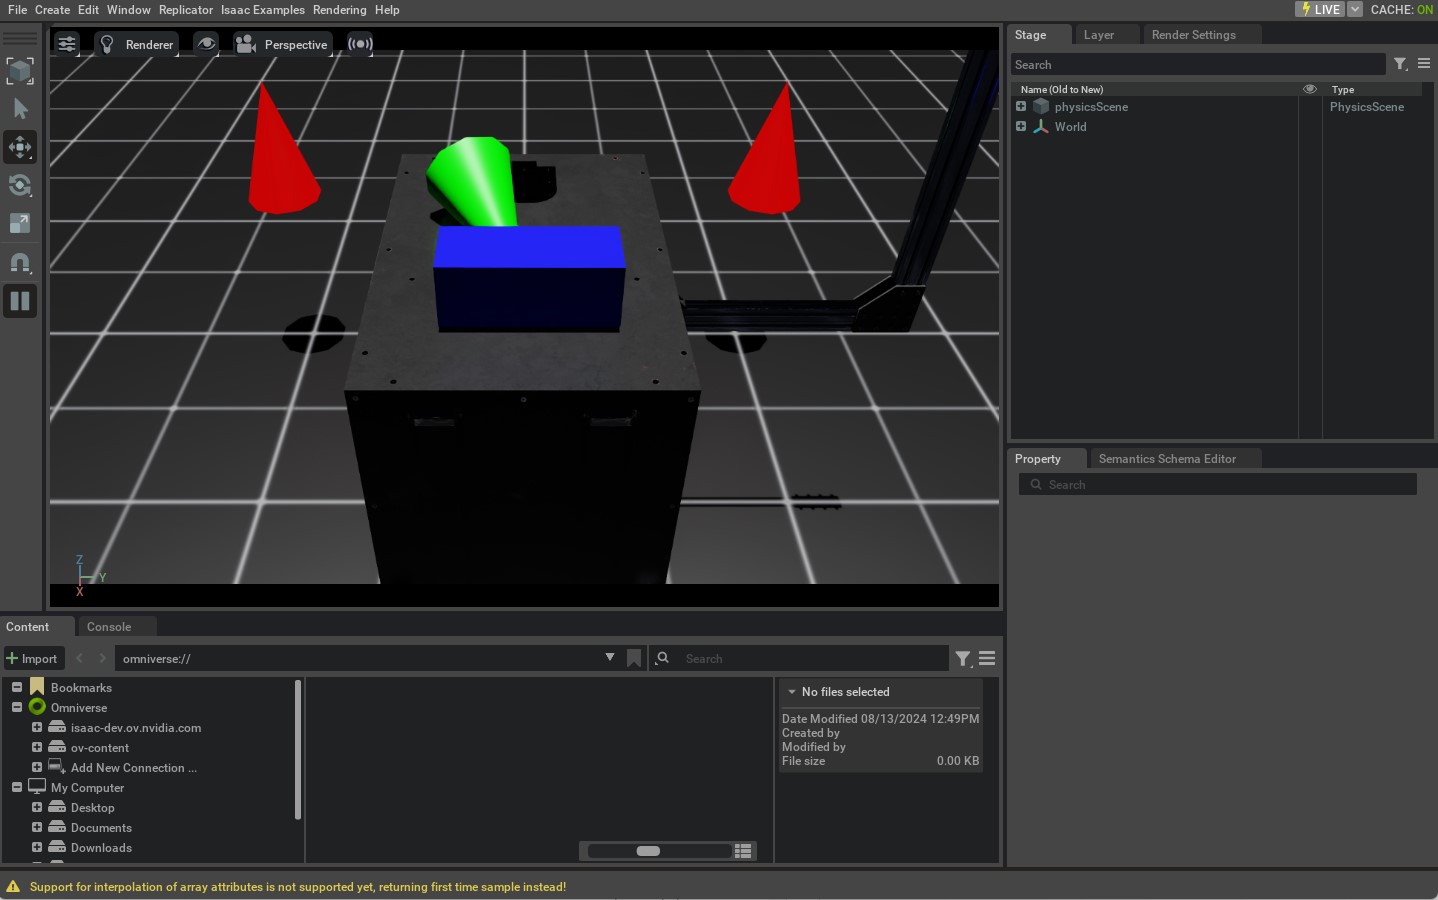
Once the simulation starts, you should see a window with a ground plane, a light, some cones, and a table.
The green cone, which has rigid body physics enabled, should fall and collide with the table and the ground
plane. The other cones are visual elements and should not move. To stop the simulation, you can close the window,
or press Ctrl+C in the terminal.

This tutorial provided a foundation for spawning various prims into the scene in Isaac Lab. Although simple, it demonstrates the basic concepts of scene designing in Isaac Lab and how to use the spawners. In the coming tutorials, we will now look at how to interact with the scene and the simulation.

