Teleoperation Data Collection#
This workflow covers collecting demonstrations using Isaac Lab Teleop with an Apple Vision Pro.
This workflow requires two containers to run:
Nvidia CloudXR Runtime: For connection with the Apple Vision Pro.
Arena Docker container: For running the Isaac Lab simulation.
This will be described below.
Note
For this workflow you will need an Apple Vision Pro.
In v0.2 we will support further teleoperation devices.
Step 1: Install Isaac XR Teleop App on Vision Pro#
Follow the Isaac Lab CloudXR documentation to build and install the app on your Apple Vision Pro.
Step 2: Start CloudXR Runtime Container#
In a terminal, outside the Isaac Lab - Arena Docker container, start the CloudXR runtime:
cd submodules/IsaacLab
mkdir -p openxr

docker run -it --rm --name cloudxr-runtime \
  --user $(id -u):$(id -g) \
  --gpus=all \
  -e "ACCEPT_EULA=Y" \
  --mount type=bind,src=$(pwd)/openxr,dst=/openxr \
  -p 48010:48010 \
  -p 47998:47998/udp \
  -p 47999:47999/udp \
  -p 48000:48000/udp \
  -p 48005:48005/udp \
  -p 48008:48008/udp \
  -p 48012:48012/udp \
  nvcr.io/nvidia/cloudxr-runtime:5.0.0
Step 3: Start Recording#
To start the recording session, open another terminal, start the Arena Docker container if not already running:
./docker/run_docker.sh
Run the recording script:
python isaaclab_arena/scripts/record_demos.py \
  --device cpu \
  --dataset_file $DATASET_DIR/arena_gr1_manipulation_dataset_recorded.hdf5 \
  --num_demos 10 \
  --num_success_steps 2 \
  gr1_open_microwave \
  --teleop_device avp_handtracking
Step 4: Connect Vision Pro and Record#
Follow these steps to record teleoperation demonstrations:
Launch the Isaac XR Teleop app on the Apple Vision Pro
Enter your workstation’s IP address in the app window.
Note
Before proceeding with teleoperation and pressing the “Connect” button: Move the CloudXr Controls Application window closer and to your left by pinching the bar at the bottom of the window. Without doing this, close objects will occlude the window making it harder to interact with the controls.
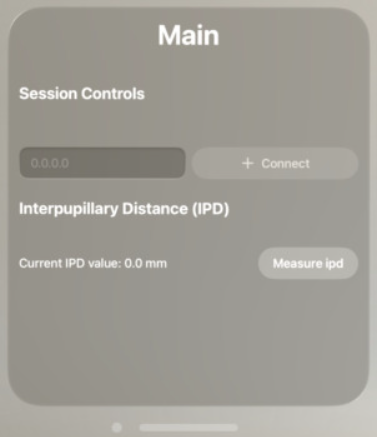
CloudXR control panel - move this window to your left to avoid occlusion by close objects.#
Press the “Connect” button
Wait for connection (you should see the simulation in VR)
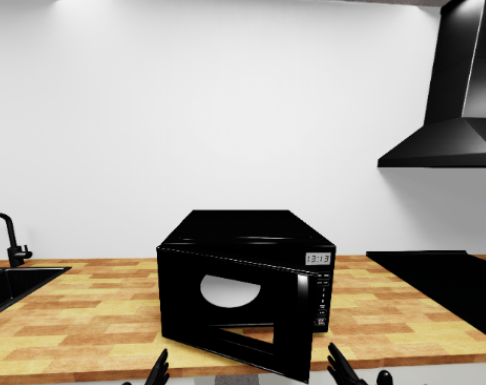
First person view after connecting to the simulation.#
Complete the task by opening the microwave door. - Your hands control the robots’s hands. - Your fingers control the robots’s fingers.
On task completion the environment will automatically reset.
You’ll need to repeat task completion
num_demostimes (set to 10 above).
The script will automatically save successful demonstrations to an HDF5 file
at $DATASET_DIR/arena_gr1_manipulation_dataset_recorded.hdf5.
Hint
For best results during the recording session:
Move slowly and smoothly
Keep hands within tracking volume
Ensure good lighting for hand tracking
Complete at least 10 successful demonstrations